Thaumcraft/набалдашники
Содержание:
- Tier 3, Magician[edit]
- Tier 3 Altar
- Blood Rituals[]
- Сверхъестественное
- Downgrades
- Кровавый алтарь.
- Mechanics[edit]
- Блоки[]
- Alchemical Arrays made easy
- Сингулярности
- As a magic school
- Заклинания.
- Setting[]
- Укрепления
- Comparator Behaviour
- Overview
- Common Build[edit]
- Ritualistic practices
- Tier 2, Apprentice[edit]
- Равноценного обмена
Tier 3, Magician[edit]
The tier 3 upgrade structure.
Keep upgrading the Altar. The next orb is significantly more complex, yet the attentive Apprentice should be getting the hang of it by now.
The Magician’s Blood Orb requires 25,000 LP, and a Block of Gold to be made. At this point the Altar can only hold 10,000 LP, so the Altar will need to be filled as the Orb is being made. If choosing self sacrifice, potions of regeneration and instant health will be needed to keep the Player alive and going. On a server, a PLayer may want to ask for friends to help, although, sacrificing passive mobs is most likely an easier way to accomplish the task at hand. such as Rune of Augmented Capacity and Rune of Sacrifice could be used.
The Blood Altar needs to be upgraded to to make the orb. This requires more Runes and some Glowstone to build.
With the Magician’s Blood Orb in hand, Blood Magic really opens up. Alchemy, Rituals, Bound Armor, Automation, and many other things become available. Feel free to browse this Wiki for more information.
Tier 3 Altar
The Tier 3 altar adds in a new structure to your altar — The pillars. These pillars are created with new materials, which will be overviewed below as well as the basic structure. At this point, your structure will reach a total size of 7x7x4(WxLxH). The pillars that you will be creating are going to have a Blood-Soaked Thaumium base with a Glowstone top. This tier of Blood Magic will not require any new requirements over the previous — Just access to some Glowstone and a lot of Thaumium Ingots.
Building the Tier 3 Altar
At this point in Blood Magic, you should be familiar with how to infuse items with Life Essence, and that is all you will be doing with the Thaumium blocks to create blood-soaked Thaumium Blocks. The recipes are as follows:

Once created, you will now need to construct the altar. Unlike the previous tier, you will not put these blocks diagonally adjacent to the previous set of Blood Runes. Instead, you will place any cosmetic block that you like, and then attach the blood runes at each end. In the corner of the Tier 3 ring, you will have 1 pillar each. It is important to note that the pillars do not need to be on Blood Runes, and can also be placed upon cosmetic blocks. For the example picture below, Ancient Diamond Blocks were used as a cosmetic block to contrast the rest of the blocks, but you are free to replace them with any block of your choosing, including no block at all.

Blood Rituals[]
There are currently 8 rituals to convert gold into blood.Each blood ritual costs 200 times more gold than the last one, except for the second ritual «Fifty Papercuts», which costs about 333 times more than the first ritual «Poke Yourself with a Tack».Each blood ritual takes 10 times longer than the previous one.
For evil difficulty, the magic requirement is 1 billion (1e9) times more than the normal magic requirement.
| Blood Ritual | Blood Gained | Gold Cost | Time to Complete in Seconds
(normal mode, 1000 magic, 1 magic power) |
|
|---|---|---|---|---|
| 1 | Poke Yourself with a Tack | 1 | 30 Million
(3e7) |
2,000 |
| 2 | Fifty Papercuts | 50 | 10 Billion
(1e10) |
20,000 |
| 3 | A Big-Ass Hickey | 2,000 | 2 Trillion
(2e12) |
200,000 |
| 4 | Eat a bowl of Barbed Wire | 60,000 | 400 Trillion
(4e14) |
2,000,000 |
| 5 | Grand Theft Blood Bank | 1.2 Million
(1.2e6) |
80 Quadrillion
(8e16) |
20,000,000 |
| 6 | Self Decapitation | 18 Million
(1.8e7) |
16 Quintillion
(1.6e19) |
200,000,000 |
| 7 | Hug a Woodchipper | 250 Million
(2.5e8) |
3.2 Sextillion
(3.2e21) |
2,000,000,000 |
| 8 | Turn Yourself Inside Out | 3.2 Billion
(3.2e9) |
640 Sextillion
(6.4e23) |
20,000,000,000 This ritual is unlocked by completing 6 |
The following table shows you only ratios, and NOT exact values — It’s a way to compare the rituals with the previous one, but not actually knowing exact values like «How much blood will I produce in one hour?», since those will depend on the magic power and allocated amount.
| Blood Ritual | Gold Per n Blood RATIO(rounded) | Blood Per n Time RATIO |
|---|---|---|
| 1 | 1 | 1 |
| 2 | 6.67 | 5 |
| 3 | 33.33 | 20 |
| 4 | 222.22 | 60 |
| 5 | 2,222.22 | 120 |
| 6 | 29,629.63 | 180 |
| 7 | 426,666.67 | 250 |
| 8 | 66,666,666.67 | 320 |
Note: Ritual 1 gives 5x less blood than Ritual 2, which is 4x less than ritual 3, which is 3x less than ritual 4, which is 2x less than ritual 5, which is 1.5x less than ritual 6, which, finally, is ~1.39x less than ritual 7. However, lower tier rituals may be better, depending on how much gold you have.
Сверхъестественное
Этот раздел является последним — и он не присутствовал в игре до ее последней версии, в которой и был добавлен. У него нет какого-либо конкретного специфического направления, как у всех предыдущих, однако можно смело сказать, что именно тут содержатся самые пугающие и запретные заклинания в мире «Таумкрафта». Используя такие рецепты, вы сможете создать, например, Металл пустоты. Это абсолютно новый материал, который вы можете использовать для создания брони, оружия и инструментов
Обратите внимание на то, что открытие данного раздела не происходит автоматически — вам необходимо достигнуть определенного показателя Безумия, который также часто называется геймерами «варпом». Причем это должно быть полноценное постоянное безумие, а не временное или базовое, так что если вы хотите получить доступ к данному разделу, придется сильно постараться
Но это действительно того стоит, так как вы получите доступ к рецептам Улучшенного хранилища эссенций, Проверке безумия, а также большому количеству различных элементов, сделанных из металла пустоты, и к предметам сингулярности.
Downgrades
Downgrades are gained by crafting them in a Penance of the Leadened Soul ritual. They remove the number of upgrade points used, allowing the player to add more upgrades.
To perform the ritual Penance of the Leadened Soul, create the ritual altar using a Master Ritual Stone and Ritual Diviner, and on the raised portion of the altar, place an Item Frame above with a Chest below. the item frame holds the «key item» to be downgraded and the chest holds the items to be consumed in the ritual. Each downgrade below and their ingredients for creation in the ritual are labeled in JEI (hover over a master ritual stone and press U for «Uses», then navigate to the «Penance (ritual)» tab)
Once the player has the downgrade they want and its related recipe, place the key item into the Item Frame and the items to be consumed in the chest, oriented as seen in JEI, activate the ritual, then crouch/sneak.
Battle Hungry gives the player exhaustion every x ticks.
| Level | 1 | 2 | 3 | 4 | 5 |
| Delay (Ticks) | 600 | 600 | 600 | 500 | 400 |
| Exhaustion Removed | 0.02 | 0.04 | 0.06 | 0.08 | 0.1 |
| Upgrade Points | -10 | -20 | -35 | -50 | -75 |
Crippled Arm stops the player’s from using their offhand.
| Level | 1 |
| Upgrade Points | -150 |
Weakened Pick slows the player’s mining speed.
| Level | 1 | 2 | 3 | 4 | 5 | 6 | 7 | 8 | 9 | 10 |
| Dig speed modifier | 0.9 | 0.8 | 0.7 | 0.6 | 0.55 | 0.5 | 0.4 | 0.35 | 0.3 | 0.2 |
| Upgrade Points | -10 | -17 | -28 | -42 | -60 | -80 | -100 | -125 | -160 | -200 |
Disoriented gives the player a chance every 20 ticks to change the direction they are looking in.
| Level | 1 | 2 | 3 | 4 | 5 | 6 | 7 | 8 | 9 | 10 |
| Chance | 0.001 | 0.002 | 0.003 | 0.004 | 0.005 | 0.006 | 0.008 | 0.010 | 0.012 | 0.14 |
| Upgrade Points | -10 | -20 | -30 | -40 | -70 | -80 | -100 | -140 | -180 | -220 |
Dulled Blade reduces the melee damage inflicted.
| Level | 1 | 2 | 3 | 4 | 5 | 6 | 7 | 8 | 9 | 10 |
| Damage Dealt | 90% | 80% | 75% | 70% | 65% | 60% | 50% | 40% | 30% | 20% |
| Upgrade Points | -10 | -17 | -28 | -42 | -60 | -80 | -100 | -125 | -160 | -200 |
Quenched stops the player from drinking potions.
| Level | 1 |
| Upgrade Points | -100 |
Loose Traction makes the player slide as if they were on ice.
| Level | 1 |
| Upgrade Points | -50 |
Diseased reduces health regeneration.
| Level | 1 | 2 | 3 | 4 | 5 | 6 | 7 | 8 | 9 | 10 |
| Health Regeneration | 90% | 80% | 70% | 60% | 55% | 50% | 40% | 35% | 30% | 20% |
| Upgrade Points | -10 | -17 | -28 | -42 | -60 | -80 | -100 | -125 | -160 | -200 |
Limp Leg reduces the player’s movement speed on land.
| Level | 1 | 2 | 3 | 4 | 5 | 6 | 7 | 8 | 9 | 10 |
| Movement Speed | 90% | 80% | 70% | 60% | 55% | 50% | 45% | 40% | 35% | 30% |
| Upgrade Points | -10 | -17 | -28 | -42 | -60 | -80 | -100 | -125 | -160 | -200 |
Storm Trooper reduces arrow accuracy. Percentages describe the amount of deviation, where 100% is directly behind the player.
| Level | 1 | 2 | 3 | 4 | 5 |
| Delay (Ticks) | 600 | 600 | 600 | 500 | 400 |
| Accuracy | 4% | 8% | 12% | 16% | 20% |
| Upgrade Points | -10 | -20 | -40 | -65 | -90 |
Кровавый алтарь.
Кровавый алтарь — блок, благодаря которому можно создавать большинство предметы из этого мода. Для создания таких предметов нужна кровь в алтаре. Её можно получить самопожертвованием с помощью жертвенного кинжала, жертвоприношением с помощью ритуалов и кинжала жертвоприношения.
В дальнейшем можно повысить уровень алтаря и улучшить его рунами.
Повышение уровня алтаря.
Второй уровень: Понадобится 8 рун.
Третий уровень: Понадобится 20 рун, 8 любых блоков, 4 светящихся камня.
Четвёртый уровень: Понадобится 28 рун, 16 любых блоков, 4 больших кровавых кирпича.
Пятый уровень: Понадобится 52 руны, 4 маяка.
Шестой уровень: Понадобится 4 кристаллических скопления, 76 рун и любые блоки.
Mechanics[edit]
The Blood Altar has no GUI. Items can be placed in the altar by Right-clicking it. It can be filled with life essence several ways, the most basic of which is the Sacrificial Orb .
To transmute an item in the Altar, it must contain the right item, be of the correct tier or greater and have some life essence in its buffer. While it is operating, the Altar emits red particles (if particles effect option is on). If there is not enough essence in the buffer, the particles turn greyish and the item starts losing progress slowly. Adding essence to the Altar will resume the transmutation. When the process is complete, a puff of red particles is emitted.
A player near a Blood Altar while under the effects of Regeneration will suffer hunger at an accelerated rate.
Блоки[]
Механизмы
| Изображения | Название | Описание |
|---|---|---|
| Магический верстак | Выполняет функции обычного верстака, а также используется для создания магических предметов. | |
| Стол исследований | Необходим для дальнейших изучений исследований, способствуя их открытию. Изменена механика изучения. Теперь не нужно собирать аспекты для изучения, вместо этого они выдаются вместе с исследованием. |
Строительные
Дерево
| Изображения | Название | Описание |
|---|---|---|
| Древесина великого дерева | Брёвна великого дерева, из них состоит само дерево. | |
| Древесина серебряного дерева | Брёвна серебряного дерева, из них состоит дерево. | |
| Великодревесные доски | Доски из великого дерева. | |
| Серебродревесные доски | Доски из серебряного дерева. | |
| Великодревесные ступени | Ступени из великого дерева. | |
| Серебродревесные ступени | Ступени из серебряного дерева. | |
| Великодревесная плита | Плита из великого дерева. | |
| Серебродревесная плита | Плита из серебряного дерева. | |
| Листва великого дерева | Из листвы состоит крона великого дерева, также в листве может быть паутина. | |
| Листва серебряного дерева | Из листвы состоит крона серебряного дерева, с небольшим шансом может выпасть саженец серебряного дерева. Используется в декорациях из-за яркого мерцания. |
Декоративные
| Изображения | Название | Описание |
|---|---|---|
| Свеча | Блок аналогичный факелу, за исключением того, что свечу нельзя ставить на стену. Можно покрасить. | |
| Нитор | Мерцающий огненный шар, используется для освещения территории, также является ингредиентом для крафта. Можно покрасить. | |
| Вымпел | Аналог флагов из оригинального Minecraft, за исключением того, что вместо узоров на них можно нанести изображение аспекта. Для этого необходимо нажать ЛКМ по вымпелу пузырьком с необходимым аспектом. | |
| Янтарный блок | Прозрачный блок, используемый для декорирования и компактного хранения янтаря. | |
| Янтарная кладка | ||
| Блок плоти | Декоративный блок, удобен для хранения большого количества гнилой плоти. | |
| Блок таум-металла | Декоративный блок, можно экономно хранить слитки таум-металла. | |
| Блок алхимической латуни | Декоративный блок, удобен для хранения алхимической латуни. | |
| Блок пустотного металла | Декоративный блок, можно экономно хранить пустотный металл. | |
| Ящик | Блок со случайным дропом, встречаются только в лабиринте разума. | |
| Урна | Блок со случайным дропом, встречаются только в лабиринте разума, в некоторых случаях и в других структурах, добавляемых модификацией Thaumcraft 5. |
Заражённые
| Изображения | Название | Описание |
|---|---|---|
| Заражённая плесень | ||
| Заражённая земля | Зачастую большое количество такой земли, можно встретить в заражённых землях, имеет тёмно-розовый цвет. | |
| Заражённая скала | ||
| Заражённый гейзер | ||
| Заросший заражённый камень | ||
| Заражённый пузырь | ||
| Заражённое бревно | Остатки деревьев; зачастую большая часть ствола отсутствует, со временем полностью исчезает из за «Эффекта гниения». | |
| Шуршащая трава |
Руды
| Изображение | Название | Описание |
|---|---|---|
| Янтарная руда | Является единственным источником янтаря. Обычно находится около поверхности. | |
| Киноварь | При переплавке этой руды, получается ртуть. | |
| Грозовые кристаллы | Генерируются в пещерах, в основном возле поверхности. При избытке вис-энергии растут. |
Растения
Все растения в модификации Thaumcraft имеют магическое происхождение, ресурсы получаемые из деревьев являются более пригодными для работы с магической энергией вис, нежели другие виды древесины.
| Изображение | Название | Описание |
|---|---|---|
| Саженец великого дерева | Огромное дерево, обладающее особыми магическими свойствами, поэтому очень часто используется в тауматургии. Не предоставляет особой сложности в нахождении и разведении, уступает по свойствам серебряному дереву. | |
| Саженец серебряного дерева | Данный вид растительности встречается довольно редко, по качеству превосходит великое дерево, участвует при изготовлении механизмов для алхимии. Можно найти в лесных биомах, но чаще всего встречается в магическом лесу. | |
| Сребролист | Растёт рядом с серебряными деревьями в количестве до 10 штук. Положив в сетку крафта, можно получить ртуть. | |
| Огненный жемчуг | Данное растение можно найти только в пустыне. Положив в сетку крафта, можно получить огненный порошок. | |
| Висомор | Произрастает в магическом лесу, испускает пары, при нахождении рядом с висомором можно получить эффект тошноты на 10 секунд. | |
| Вечноцвет | Цветок, получаемый путём алхимии, довольно дорогой в создании, но его способность поглощать заражение оправдывает его цену. |
Alchemical Arrays made easy
There’s another new crafting mechanic. To get started, we’ll need some Arcane Ash. That’s going to require Redstone, Bone Meal, Gunpowder, and Coal in your Hellfire Forge. Don’t worry, this stuff is multi-use, so you’ll only need one pile of ash to begin with.
When making an alchemical array, you have three things: The basic transmutation circle, the reagent, and the binding item being infused. Let’s start with the trusty Divination Sigil.
We’re going to need our Arcane Ash, a piece of Redstone, and a Blank Slate. Go out to a wide open area (preferably 5×5) that is able to see the sky. Right click your arcane ash on the ground, you should see a basic no-frills transmutation circle. Now right-click the redstone dust onto it. You should see the transmutation circle change, with a little eye in the middle. Now right-click with the Blank Slate. You’ll get a pretty little cinematic, and voila! Your Divination Sigil is ready.
All of your sigils are made in a similar fashion.
Сингулярности
Своеобразная вершина возможностей тауматургии в области атаки — набалдашник сингулярности. При активации данного набалдашника из жезла вырывается сфера разрушительной энергии, перемещающаяся со средней скоростью и по очень пологой траектории вперед. При попадании в цель сфера взрывается с большой силой (без улучшений жезла и набалдашника на урон эффект подобен взрыву крипера). Для изготовления данного набалдашника сначала потребуется изготовить амулет сингулярности. Для изготовления этих вещей потребуются все виды аспектов из жезла по 25. При активации данного набалдашника потребляются все аспекты, но количество расходуемых аспектов определяется случайным образом в указанном интервале. Также при взрыве от набалдашника сингулярности может появится узел ауры с теми или иными основными аспектами (в основном в таком узле количество одного аспекта равно 5).[]
| Рецепт | Расход аспектов | |
|---|---|---|
| для создания | при активации | |
| 25 | Нет | |
| 25 | 0,5 — 2,5 |
As a magic school
As the name suggests, bloodmages use blood to perform their rituals. All blood is different, and the correct combinations are required to perform certain tasks. Contrary to popular belief, ancient and powerful bloodmages do not actually drink blood, but eat normal food like everybody else.
On Azeroth, it is shunned by many as a dark and forgotten art. In that and many other ways, it shares some distinct characteristics with demonic magic. Blood magic can be used to teleport via bloodstone teleporters, scry for information, and resurrect the dead. In addition to true resurrection, it can also be used to create undead as seen with the followers of G’huun in Nazmir.
Interestingly, several users of blood magic like the Blood Wizards, Bonechewer Blood Prophets and Defias Blood Wizards are able to cast Bloodlust or a Bloodlust-like spell.
Заклинания.
Первым делом, для создания заклинаний понадобится кровавый алтарь и стол заклинаний. Ставим их вплотную друг к другу. Ещё понадобится кристалл отвязывания. Дальше нужно поставить на стол заклинаний голову (зомби, скелета-иссушителя, скелета, крипера). Каждый из них в сочетании с предметом даёт свой эффект. Все предметы кладутся на кровавый алтарь. Чтобы использовать заклинания, нужно привязать шар отвязывания к столу(ПКМ), а потом уже ПКМ держа в руке шар отвязывания.
Предметы, которые можно использовать для заклинаний: лёд, динамит, кровавый шар ученика, обсидиан, огниво, светящаяся пыль, слеза гаста.
Сочетания голов с предметами:
Лёд: в сочетании с черепом скелета стреляет «льдом», наносящим 6 урона, даёт медлительность. В сочетании с черепом скелета-иссушителя даёт тот же эффект, что и череп, но больше радиус. В сочетании с головой зомби создаёт стену из льда 5×5. В сочетании с головой крипера замораживает воду.
Динамит: в сочетании с черепом скелета стреляет снарядом, который взрывается. В сочетании с черепом скелета-иссушителя взрывает блоки вокруг вас. В сочетании с головой зомби создаёт взрыв вокруг вас, но он не взрывает блоки. В сочетании с головой крипера создаёт усиленный взрыв вокруг вас.
Кровавый шар ученика: в сочетании с черепом скелета выпускает снаряд, наносящий 8 урона. В сочетании с черепом скелета-иссушителя создаёт маленький взрыв, наносящий урон. В сочетании с головой зомби стреляет снарядами вокруг вас, наносящими 8 урона. В сочетании с головой крипера создаёт взрыв, наносящий урон.
Обсидиан: в сочетании с черепом скелета выпускает снаряд, наносящий 8 урона и дающий медлительность. В сочетании с черепом скелета-иссушителя выпускает несколько снарядов с теми же эффектами, но наносят они 3 урона. В сочетании с головой зомби создаёт вокруг вас коробку 3×3 из камня. В сочетании с головой крипера превращает воду в землю и песок.
Огниво: в сочетании с черепом скелета выпускает снаряд, создающий огонь 3×3. В сочетании с черепом скелета-иссушителя выпускает снаряд, создающий чуть больше огня, дальность меньше. В сочетании с головой зомби поджигает существ вокруг вас. В сочетании с головой крипера создаёт огонь вокруг вас.
Слеза гаста: в сочетании с черепом скелета выпускает снаряд, откидывающий существ. В сочетании с черепом скелета-иссушителя существа вокруг вас. В сочетании с головой зомби вы делаете «рывок» вперёд. В сочетании с головой крипера откидывает существ вокруг вас.
Setting[]
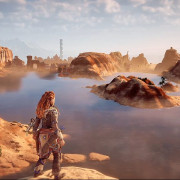
The in-game map, where battle-maps may be selected in the Legendary Campaign.
Blood & Magic uses the Dungeons & Dragons license and is set in the Forgotten Realms campaign setting, in a heretofore unknown region that would become known as the Utter East. Despite this, it has few connections to either D&D or the Realms, instead using largely generic fantasy elements with many deviations from conventional D&D, such as its medusa-like gorgons and goblin-like gnomes. In common with core D&D are its green regenerating trolls, the use of an alignment system in character creation for the Legendary Campaign (albeit restricted to lawful good), and a mind flayer face in character creation and randomized opponents. It seems likely the D&D license was only a late-stage or desultory introduction during development
An Arbor Lodge (top right) in the Hall of Wonder map with Gondar tiles.
It has a few more connections with the Realms beyond using the map, with references to the Great Sea and being set «before the Time of Troubles». Most explicit are the names and holy symbols of the gods Chauntea (though closer in concept to Silvanus), Lathander, Mystra, Myrkul, and Tempus for its sacred shrines and Well of Immortals in the Hall of Legends map, as well as a strong suggestion of Gond at the Hall of Wonder. Most obvious is the cover art: the painting «Deadlock» by Larry Elmore, which also graces The Bloodstone Lands and several other Realms works. However, even the generic European-style fantasy setting of Blood & Magic is quite out-of-place in a land tucked between the Shining Lands and Zakhara, where an Asian- or Arabian-style setting might be expected to better fit with the surrounding cultures and history.
Instead, Blood & Magic hinges on some quite novel concepts of faithful golems that meditate to produce mana and that can transform into structures and advanced creatures, and on mysterious bloodforges that create them from, as the name and advertising material suggest, fire, blood, and magic, utterly unlike the stock fantasy concepts used in Warcraft at the time. The final campaign pits the player against mysterious Immortals, who may or may not be the above-named gods. But these interesting ideas are barely hinted at in game materials.
In 1998, the Utter East was developed further, with the novels of the Double Diamond Triangle Saga and Faces of Deception and the Realms of Mystery short story «Darkly, Through a Glass of Ale» all published in that year and set in and around the Utter East. These all made efforts to adapt details from the Blood & Magic game and to incorporate South Asian and more fantastical elements so it better suited the area. Copies of parts of the Double Diamond Triangle Saga were even included in later releases of Blood & Magic to provide background material. In the years after, the area would be forgotten and then perennially recalled by fans, who’d speculate on its concepts and develop various fanon theories.
Curiously, the Eberron Campaign Setting, debuted in 2004, is based on five kingdoms that fought a long and devastating war, with one side fielding armies of undead and all sides using manufactured armies of warforged, golem warriors made using legendary creation forges. There are also artificers and a goblin kingdom. It all sounds a bit familiar.
Укрепления
Этот мощный набалдашник обладает очень интересным и очень полезным действием на блоки: они становятся абсолютно неразрушимыми никем и ничем. К счастью, этот эффект может быть отменен тем же самым воздействием и от того же самого тауматурга. Основные функциональные свойства блока после укрепления будут сохранены: грядки по прежнему позволяют выращивать на них растения, растительность сохраняется и также становится неразрушимой. Однако магия укрепления изолирует блок от обычных воздействий мира, поэтому редстоун больше не проводит сигнал, жидкости теряют текучесть, лед и снег не тают. Также, жидкости под действием укрепления становятся невидимыми (версия 4.1.0f).
| Объект | Основа | Ингредиенты | Эссенция | Нестабильность | Расход аспектов при активации | |||||||||||||||||||||||
|---|---|---|---|---|---|---|---|---|---|---|---|---|---|---|---|---|---|---|---|---|---|---|---|---|---|---|---|---|
|
|
|
Средняя |
|
Comparator Behaviour
The Blood Altar has 2 methods of outputting a comparator signal. By default, it will provide a signal denoting how much blood it is carrying, similar to a chest. If a Bloodstone Brick is placed directly underneath the altar and any Blood Orb is placed in it, it will output a signal that corresponds to the linked Blood Network’s currently stored LP. This can be useful for automation. It measures how much LP is in the altar compared to the max amount of LP the given Blood Orb has. For example, if a Master Blood Orb is elsewhere collecting LP and an Apprentice Blood Orb is being measured, the comparator output will show as «full» even if the network is well below the capacity the player’s Master Blood Orb.
Overview
Through the practice of blood magic, a Cainite can summon fire, control the weather, and do many other things which are unnatural even by vampiric standards. To practice Blood Sorcery is to twist one’s own Blood into submission. Any form of this power reminds a vampire that they’re far from human, as no mortal could wield magic in this way.
The ways of the Blood Sorcery are generally learned as paths, collections of related magical effects which superficially resemble Disciplines, though the early blood magicians learned they could also create special rituals thematically connected to any paths they studied. These could have longer-lasting or more powerful effects. Unlike other disciplines, which could be described as advancing organically through the victims chosen by the vampire, practitioners of Blood Sorcery require teachers.
The various forms of blood magic are distinct from Disciplines; though they are blood-based powers, and paths are learned in tiers as Disciplines are, such knowledge is neither passed on to one’s childer nor amenable to elder-level manifestations. While Disciplines are powers which stem from the nature of vampirism, or in stranger cases, the exotic natures of their creators, blood sorcery seeks to achieve almost any effect imaginable by focusing the magical power of blood through an act of will.
These arts have been practiced in many forms throughout Cainite history. In ages past, Dur-An-Ki (now known as «Assamite Sorcery») was the most prominent type of blood magic. Though Dur-An-Ki and many other older styles have survived into the Modern Nights, without doubt the most prolific and famous practitioners of blood sorcery in recent history are the members of Clan Tremere.
The Tremere were originally a House of mages belonging to the Order of Hermes. Through a powerful ritual, they became vampires, founding their own Clan, but afterward discovered they could no longer work magic as they once did. Instead they adapted their knowledge of Hermetic magic into a new tradition of blood sorcery known as Thaumaturgy, whose secrets they jealously guard from all those outside of their clan.
The most prominent form of non-Thaumaturgical blood magic in the modern nights is the Necromancy of the Giovanni clan. Necromancy borrows from the mystical traditions of the Mortis Discipline of the long-destroyed Cappadocian clan, though even in modern times the Giovanni are not its only practitioners. The Tremere maintain that Blood Sorcery, or “Thaumaturgy” as they call it, was their invention, and other clans make similar statements — but while the origins of Blood Sorcery are murky, its dreaded nature is not.
Common Build[edit]
It is common to incorporate Well of Suffering, Ritual of the Feathered Knife and Ritual of Regeneration into an Altar as these are designed to fit into it. Common patterns with exact positioning are listed below. Master ritual stone is always placed directly above or below the altar, specified distance from the altar is minimal distance for an exact fit.
Ritual Above an Altaredit
Mob sacrifice build:
- Leave out 2 blocks above the altar
- Place Ritual of Regeneration
- Place Well of Suffering
Self-sacrifice build:
- Leave out 1 block above the altar
- Place Ritual of the Feathered Knife
- Place Ritual of Regeneration
Ritual Under an Altaredit
Mob sacrifice and Self-sacrifice build:
- Leave out 2 blocks below the altar (1 empty block below 2nd tier runes)
- Place the Master Ritual Stone for Ritual of the Feathered Knife or Well of Suffering
- Place the Master Ritual Stone for Ritual of Regeneration directly beneath this (3 blocks below the altar)
Ritualistic practices
Since we’ve mentioned Rituals a few times, perhaps now is a good time to explain a bit more about them.
Basically, a Ritual is going to require a large area, because it’s going to be a large multiblock structure that is going to produce an effect. Some of them are small, like the Serenade of the Nether which creates Lava source blocks in exchange for LP, whereas some of them are significantly larger, such as the Sound of the Cleansing Soul I mentioned earlier.
First, you’re going to need a Master Ritual Stone, which requires ritual stones and some other fun toys.
The next thing you need… well, TECHNICALLY you don’t need it, but only a fool will do rituals without one, is the Ritual Diviner. This thing is your hot ticket to making sure you never screw up the placement of the ritual stones, because you shift-right click around until you find the ritual you want, then spam the master ritual stone. For the cost of LP, it will automatically place the proper ritual stones in their proper order, assuming the way has been made clear for it.
You will need to upgrade your ritual diviner if you want to use Dawn or Dusk ritual stones.
Once your ritual stones have been properly placed, you need a way to activate it, for this, you need a weak activation crystal, which is obtained by taking a Lava Crystal (which is a handy way of running a furnace off of LP) and putting it in a Tier 3+ blood altar with at least 10,000 LP. Don’t forget to right-click to bind it to yourself.
Tier 2, Apprentice[edit]
The tier 2 upgrade structure.
At this point, it is probably a good idea to start upgrading the altar. To upgrade the altar, place some Runes near it arranged into a . Once the altar has been upgraded to Tier 2, the Player can choose to either continue using their own blood, or use the blood of others by making a Dagger of Sacrifice and using it on any living mob near the altar, including Players.
Another item to make after obtaining the Tier 2 altar is the Apprentice Blood Orb. This is an upgraded Blood Orb than can store 25,000 LP. The new orb will require infusing an emerald with 5,000 LP in a Blood Altar. With this orb, several more type of Rune and Sigil become available, such as the Rune of Self-Sacrifice and the Air Sigil.
More Power, More Possibilitiesedit
Now that the tier 2 Orb has been achieved, the Alchemy part of Blood Magic can start. Alchemy basically allows to make potions and reagents. Every potion made this way has eight uses. Strong or long lasting effect potions can be made (for example: Haste with a duration of 30:00) with combined effects.
Another branch of Blood Magic now available is Spell casting. These are useful early game ranged weapons and utility items, and it is recommended to at least try them.
Also available are the Air Sigil, the Void Sigil, the Sigil of the Fast Miner, and the Sigil of the Green Grove. A quick summary of their effects, respectively: Crude but fast flight, an endless empty bucket, a portable beacon effect, and a way to use blood as fertilizer.
Равноценного обмена
Набалдашник равноценного обмена позволяет с легкостью выполнять декорирование с помощью блоков путем простейшей замены установленных блоков на те, которые имеются в инвентаре. Для этого необходимо сначала «захватить» блок нажав Shift+ПКМ на установленном блоке-«заменителе», а затем указывать с помощью палочки на заменяемые блоки. При этом нажатие ЛКМ приведет к замене только одного блока, а нажатие ПКМ приведет к замене сразу целой области (по кругу, размерами не более 5х7 или пока хватит блоков в инвентаре). Если эта площадка собрана из различных блоков (например, каменный кирпич и обычный кирпич), то заменены будут только однотипные блоки. Изготавливается после завершения исследования «Набалдашник для жезла: Равноценный обмен». Лучшим жезлом для данного набалдашника будут изготовленные из кварцевого или костяного стержней с золотыми (таумиевыми) наконечниками.
| Рецепт | Расход аспектов | |||||||||||
|---|---|---|---|---|---|---|---|---|---|---|---|---|
| для создания | при активации | |||||||||||
|
|