Introduction to resource packs
Содержание:
Creating a resource pack[]
All the resources and instructions in a pack reside in the pack folder, which lives in the «resourcepacks» directory. You may wish to use an IDE to help keep track of the files within your resource pack if there are multiple.
In versions 1.11 and higher, all file names within a resource pack should use lowercase letters only.
Creating the Folder
The first thing we need to do is create the folder that will contain all the resource pack files. Create a folder on your desktop or another easily accessible location and name it . This will eventually be the name displayed in the resource pack menu.
Creating a .MCMETA file
Within your resource pack folder, we need to create a file. This lets Minecraft know that the folder is a resource pack and contains useful information such as:
- The recommended version for the resource pack.
- The description displayed under the pack title in the selection menu.
- Preliminary information on any custom languages added in the resource pack.
To create this file, we need to create a text file within the folder and name it . Make sure the file extension is and not or the pack may not be detected. When renaming you may get a warning that changing a file name extension could make the file unusable or may switch the program required to open it. You can still open this file in a text editor by right-clicking the file and selecting the «Open With» option. Note: You may need to select a program using your file browser.
Formatting pack.mcmeta
Open in a text editor or IDE of your choice and type or copy+paste the following:
{
  "pack" {
    "pack_format" 7,
    "description" "Tutorial Resource Pack"
  }
}
The value of tells Minecraft what release the resource pack is designed for, and is different for certain versions. The following list what versions each value is associated with:
- for versions 1.6.1 – 1.8.9
- for versions 1.9 – 1.10.2
- for versions 1.11 – 1.12.2
- for versions 1.13 – 1.14.4
- for versions 1.15 – 1.16.1
- for versions 1.16.2 – 1.16.5
- for versions 1.17.x
- for 1.18 snapshots
Note: As more updates are released, values may be changed or added.
The text following is displayed under the pack title in the selection menu, and must be put inside quotes . If you wish to use special characters, you can enter the Unicode code for the character in the format , where is the Unicode hex code for the character. Say you want to use the letter Þ (Thorn), which has code . Inside the description you would type . Make sure that you are using the correct slash, or it may not work. A list of Unicode codes can be found here. Note: Only the characters 0000–FFFF (Basic Multilingual Plane) are supported.[citation needed]
Correct syntax
Be very careful not to forget quotation marks , colons , braces , or square brackets . Missing one of these can lead to your resource pack not being detected by Minecraft. Make sure that your file matches the one shown above.
Testing your Pack
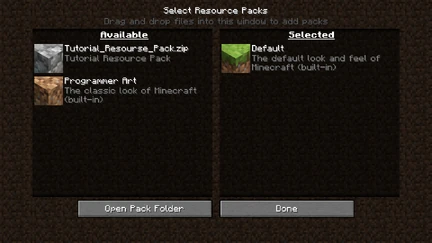
If your resource pack is formatted correctly, it should appear in the selection menu like this.
At this point, you can test if the pack is formatted correctly by putting it in the game! To do this you must place your resource pack folder in the Minecraft pack folder. You can access it by selecting «Options», then «Resource Packs», then «Open Pack Folder», or you can navigate to it from your file browser:
- For Windows, right click on the start button → run → type in %appdata% → .minecraft → resourcepacks
- For MacOS, go to Library → Application Support → minecraft → resourcepacks
- For Linux, go to ~/.minecraft/resourcepacks (/home/<username>/.minecraft/resourcepacks)
Once you have the folder open, you can drag your custom pack folder and drop it in.
If you have formatted the files correctly, you should see your resource pack appear in the menu.
Troubleshooting
If you don’t see your pack in the list, make sure your file is correct and saved in the folder. Look for any missing braces , commas , colons , quotation marks , or square brackets . Remember that for each open brace, quotation, or square bracket, you must have a closing brace, quotation, or square bracket.
If an icon is not specified, a cobblestone icon will show up next to the pack. If you want to use your own pack icon, you can place it inside your resource pack folder with the name . The file must be a PNG, and works with any square resolution, but a 128×128 pixel image renders the best.
Скачать плагин Force Resourcepacks
Скачать плагин версии Force Resourcepacks 1.11.8
Данный файл могут скачать только пользователи с группой Gold Повысить аккаунт до GOLD
Скачать плагин версии Force Resourcepacks 1.11.7
Данный файл могут скачать только пользователи с группой Gold Повысить аккаунт до GOLD
Скачать плагин версии Force Resourcepacks 1.11.6
Данный файл могут скачать только пользователи с группой Gold Повысить аккаунт до GOLD
Скачать плагин версии Force Resourcepacks 1.11.5
Данный файл могут скачать только пользователи с группой Gold Повысить аккаунт до GOLD
Скачать плагин версии Force Resourcepacks 1.11.4
Данный файл могут скачать только пользователи с группой Gold Повысить аккаунт до GOLD
Скачать плагин версии Force Resourcepacks 1.7.22.1
Данный файл могут скачать только пользователи с группой Gold Повысить аккаунт до GOLD
Changing the dirt block
With the manifest file completed, you can now start adding custom content to Minecraft. Let’s get started by applying a new texture to the vanilla dirt block. The first part of the process involves creating a folder structure to hold the texture.
- In File Explorer, in the My_RESOURCE_Pack folder, create a folder and name it textures.
- Double-click the textures folder to open it.
- Inside the textures folder, create a folder and name it blocks.
- Double-click the blocks folder to open it.
Creating the texture
Now that the folder structure is created, you can place your custom textures there. This little, green square is an example of the type of file created by the following steps.
You can download it and save it in your blocks folder or follow these steps to create your own texture:
- Open up an image editor such as MS Paint.
- Go to the File menu and select Properties.
- Set the Width and Height to 16 pixels each.
- Click OK.
You can now design a pattern or any artwork in the editor. To make the green square, a simple fill color was added.
Note
MS Paint is used in this example for quick and easy access, but you will need to use a different graphics editor for more advanced graphic features like transparency effects or .tga file support.
- When you’re done editing your texture, go to the File menu and select Save As.
- Chose the PNG picture option.
- In the Save As dialog box, navigate to the blocks folder you created.
- Save the file as dirt.png.
Testing the pack
Now that the pack has both a manifest file and a texture, you can launch Minecraft and test your new resource Add-On.
Important
Pack Stacking is how content is loaded on top of vanilla content, causing each object that has the same name in both packs to be overwritten by the latest applied pack. In our example, the original dirt texture is overwritten by our custom texture.
If another pack that uses the dirt.png file is loaded after My_RESOURCE_Pack, then Minecraft will use that one instead and you won’t see that change.
Your custom texture will be used on every dirt.png block in the world, but it will not be used on blocks of dirt with grass on them because those block have a different name.
- Launch Minecraft and select Play.
- Select Create New World.
- Under Settings, scroll down to the Add-Ons section.
- Click on Resource Packs to see all available packs.
- Click the MY PACKS drop-down to open it.
- Select My RESOURCE Pack and click Activate to add the resource pack to the world.
- Click Create to create your world.
Важные заметки
Этот плагин в настоящее время совместим с BungeeCord выше 1.8, Velocity версии 1.1.0, Spigot выше 1.8.8 и клиентами выше 1.8.
Обычно автор плагина старается сохранить обратную совместимость, но иногда это невозможно, и вам может потребоваться установить более старую версию плагина, чтобы она работала. (например, Spigot 1.12.2 может потребоваться версия плагина ниже 1.7.22)
Также в предстоящем обновлении Minecraft 1.17, как предполагается, наконец-то будет добавлена встроенная функция, которая потребует ресрупак сервера и информацию для пользователя о том, что сервер принудительно устанавливает ресурспак. Насколько автор плагина может судить сейчас, это не должно изменить основное поведение этого плагина и оставить все действия без изменений.
Автор плагина также планирует каким-либо образом поддержать этот экран предупреждения перед загрузкой в плагин. (Например, через отдельную опцию конфигурации)
Также обратите внимание, что клиент Vanilla Minecraft применяет только серверные ресурспаки размером менее 100 МБ! (50 МБ до версии 1.15)Кроме того, некоторые новые сертификаты SSL для URL-адресов (например, Let’s Encrypt) не работают со старой версией Java, поставляемой с Minecraft (Java 1.8.0_51, отчет об ошибке был отправлен в Mojang, который, надеюсь, будет исправлен в Майнкрафт 1.17 в Java 16), поэтому вам придется либо использовать другой сертификат, либо загружать незашифрованные файлы (не рекомендуется!)
Сервер не может обнаруживать ресурспаки клиента, поэтому этот плагин работает только с ресрупаками сервера!
Чтобы этот плагин работал, он подключается к внутреннему коду Bungee, это может привести к проблемам, если есть обновление Bungee, изменяющее его внутреннюю структуру. Подобные проблемы могут также возникнуть, если плагины изменяют внутреннее устройство Bungee неподдерживаемым образом. В настоящее время единственным известным плагином, вызывающим эту проблему, является SKungee. К сожалению, единственный способ обойти это (кроме решения проблемы с помощью SKungee):
Права плагина :
forceresourcepacks.command — Доступ к команде /frpforceresourcepacks.command.reload — Доступ к /frp reloadforceresourcepacks.command.generatehashes — Доступ к /frp generatehashesforceresourcepacks.command.version — Доступ к версии /frp
forceresourcepacks.command.usepack — Доступ к /usepackforceresourcepacks.command.usepack.others — Отправляйте ресурспаки другим игрокам с помощью команды / usepackforceresourcepacks.command.usepack.porary — Выберите, является ли выбранный ресурспак только временным или должен быть сохранен и применен повторно
forceresourcepacks.command.resetpack — Доступ к /resetpackforceresourcepacks.command.resetpack.others — сбросить ресурспаки других игроковforceresourcepacks.command.resetpack.temporary — Сбросить параметр,в котором учитывается должен ли ресурспак только временно сбрасываться, а не сохраняться
forceresourcepacks.command.getpack — Доступ к /frp getpackforceresourcepacks.command.getpack.others — Получить приложенный пак других игроков
forceresourcepacks.command.getstoredpack — Доступ к /frp getstoredpackforceresourcepacks.command.getstoredpack.others — Получить сохраненный ресурспак других игроков
forceresourcepacks.command.packusage — Доступ к /frp packusage
forceresourcepacks.command.addpack — Доступ к tpo /frp addpackforceresourcepacks.command.pack — Доступ к /frp pack для редактирования ресурспаков
forceresourcepacks.command.assignment — Доступ к назначению /frp для добавления и редактирования назначений сервера / мираforceresourcepacks.command.deleteassignment — Доступ к /frp deleteassignment для удаления назначения сервера / мираforceresourcepacks.command.globalassignment — доступ к /frp globalassignment для просмотра и редактирования глобального назначения
forceresourcepacks.pack.<имя ресурспака> — Предоставляет доступ к ресурспаку с помощью команды / usepack, вы можете определить эти разрешения через config.yml для каждого ресурспака.
forceresourcepacks.updatenotification — получение уведомлений об обновлениях в игре
forceresourcepacks.bypass.required — Обходит требование ресурспака ресурсовforceresourcepacks.bypass.<назначение>.required — Обходит требования к ресурспака для конкретного заданияforceresourcepacks.bypass.<действие> — Обойти определенное действие для всех статусов и назначенийforceresourcepacks.bypass.<status>.<action> — пропустить определенное действие для определенного статуса во всех назначенияхforceresourcepacks.bypass.<назначение>.<действие> — Обойти определенное действие определенного назначения для всех статусовforceresourcepacks.bypass.<assignment>.<status>.<action> — пропустить определенное действие для определенного статуса определенного назначения
Building the Resource Pack
The first part of creating a resource pack is to create the folder that will hold your custom content. It will need to be placed in a location where Minecraft can find it so your changes can be loaded into the game.
- Open your com.mojang folder.
- Double-click the development_resource_packs folder to open it.
- Add a new folder and name it My_RESOURCE_Pack.
- Double-click the *My_RESOURCE_Pack folder to open it.
Creating a Manifest File
To load a resource pack into Minecraft, a manifest file will need to be created. The manifest file is a JSON file that contains the following information:
- Description: In-game description of what the resource pack does.
- Name: In-game name of the resource pack.
- UUID: Universally Unique Identifier.
- Version: Version of the resource pack.
- Minimum Engine Version: Required version of Minecraft that this pack will work in.
Minecraft will parse the information from the manifest file and display it in the Add-On section of the game. Inside the file, the information will be split into two separate sections: header and modules. The header section will contain the overall information for the pack, and the modules section will contain the dedicated packages information.
- Right-click in the Explorer window, select New > Text Document.
- Name it manifest.json.
- You will need to change the file extension from .txt to .json. If your Explorer window does not show file extensions, you can enable File Name Extensions under the View tab.
- Double-click the manifest.json file to open it in a text editor.
- Copy and paste the following code into your file.
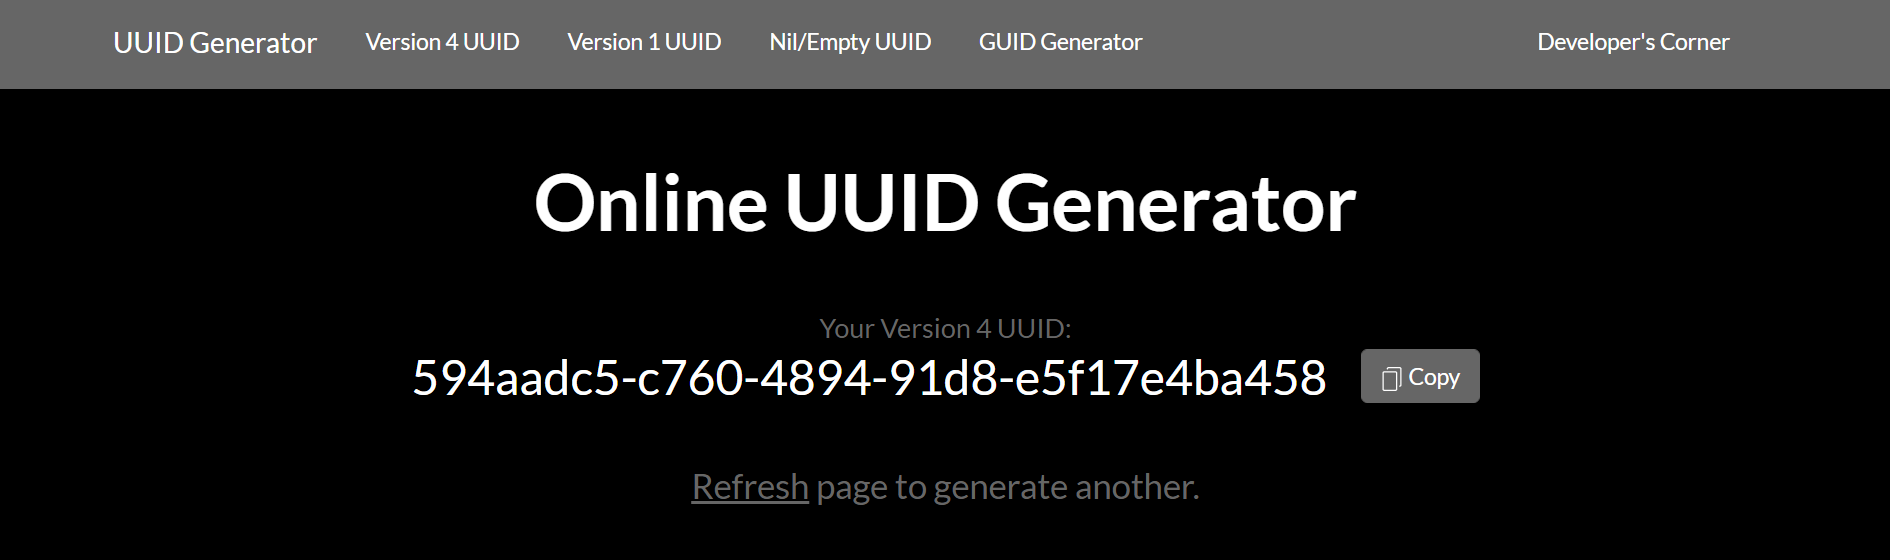
UUID
Universally Unique Identifier, or UUID for short, is a unique number used to identify different software. For Minecraft, the UUID is used to define a specific pack and to prevent any duplicate software from causing issues. For the header and modules, there will need to be two different UUID numbers entered in each of the fields between the quotes. You can get UUIDs from an online UUID Generator such as https://www.uuidgenerator.net/.
- Copy and paste a UUID into the header section. The UUID will need to be pasted in the field between the quotation («») marks in order to be read correctly.
- Refresh the webpage to generate a new UUID for use in the Modules section.
- Copy and paste the new UUID into the modules section in the field between the quotation marks.
- Save the manifest.json file.
Note
To learn more about how a manifest.json file works, you can click this link to see the page in the Addons documentation: manifest.json.
Server Resource Packs[]
If you are the owner of a server, you may set it as the resource pack of your server.
- Make sure your pack format is a .zip-folder.
- Open the server.properties with a text editor.
- Search for the line «resource-pack=».
- Paste the download link after the equal sign.
- Optional: Set the «resource-pack-sha1» hash sum of the pack file.
- Save your changes to the server-properties and restart your server.
- Enjoy!
Servers can have an icon that will show up in the Multiplayer list.
- Create a PNG image with a size of 64 by 64 pixels, transparency is supported.
- Save (or rename) it to .
- Move it to the server’s directory.
- Restart the server.
- Server icons will display next to the server name.
Команды плагина Force Resourcepacks:
/frp reload — Перезагружает файл конфигурации; повторно отправляет ресурспаки каждому онлайн-игроку, если второй аргумент — «повторно отправить»/frp generatehashes — Загружает файлы ресурспаков и генерирует их хэши sha1/frp version — Показывает версию этого плагина/frp pack <pack> — Изменить стоимость ресурспака/frp addpack <имя> <url> — Добавьте новый ресурспак (проверьте mc-packs.net, если вам нужен хост ресурспака сервера)/frp removepack <имя> — Удалить ресурспак/frp getpack — Получить текущий примененный ресурспак игрока/frp getstoredpack — Получить сохраненный ресурспак игрока (требуется UUID для автономных игроков)/frp packusage <pack> — Получите примененные и сохраненные подсчеты для ресурспака/frp listassignments — Список всех назначений сервера / мира/frp deleteassignment <назначение> — Удалить определенное назначение сервера / мира/frp globalassignment | назначение <назначение> — Отображение / редактирование значений определенного назначения или глобальных. Подкоманды: — info — pack <pack> — required true|false — promptmessage <message> — addsecondary <pack> — removesecondary <pack> — regex <regex> — senddelay <delay in ticks> — addaction <status> <action> <value> — removeaction <status> — addfirstjoinaction <status> <action> <value> — removefirstjoinaction <status> /usepack — Перечислите все пакеты, которые вы можете выбрать/usepack <имя пакета> — Отправьте определенный набор себе или другому игроку, в зависимости от значения временного, он будет применяться только для этого сеанса или также будет применяться повторно при следующем входе в систему. Значения истинны или ложны, если их не указывать, будет использоваться usepack-is-временное значение конфигурации (по умолчанию true)/resetpack — Сбросить ресурспак игрока.
Getting Started[]
Making a Resource Pack
Minecraft has a unique mechanic that allows for text and media files to be added to the game files that allow for everything from custom block textures and models to custom credits and sound events. This tutorial is meant to help with setting up the file systems in order to implement them. Since the files are essentially code, there are technical rules for how to format files and certain things may change from version to version. As such, what is written in this tutorial may not apply to every situation, but in the case where the difference is significant and specific, it will provide a framework on the changes needed for different versions.
This tutorial is geared toward the latest release of Minecraft, which is currently 1.17
{
  "pack": {
    "pack_format": 7,
    "description": "My Resource Pack"
  },
  "language": {
    "LANG_COUNTRY": {
      "name": "My Custom Language",
      "region": "Country/Region name",
      "bidirectional": false
   253 }
 252 }
251}
Tools
Creating custom files for Minecraft, whether in the forms of resource/data packs or mods, is somewhat technical and can be difficult. There are many rules that must be followed in order for add-ons to work correctly, most notably how the files are formatted. There are many tools that can help mitigate these issues, some of which are listed here.
IDE
Making a resource pack involves creating JSON text files, which can be tricky to use and format correctly. Many IDEs (Integrated Development Environment) assist with formatting these files and making sure proper syntax is used, as well as help organizing files in a project. Here are some suggestions:
Notepad++ — A very lightweight IDE. very easy to use
Preface[]
Resource packs allow users to include files that can modify or add custom textures, models, animations, music, sounds, user interfaces, and languages that change the way some things in Minecraft behave or look.
What NOT to do
There are some things that you should NOT do when creating a resource pack / texture packs, which includes but is not limited to:
- Release files that allow users to play a release of Minecraft without having purchased it from Mojang.
- Release the decompiled source code of Minecraft in any way.
It is also suggested that you never extract game files to your desktop, as it can result in technical issues.