Default texture pack (template) 1.17.1 → 1.8
Содержание:
Preface[]
Resource packs allow users to include files that can modify or add custom textures, models, animations, music, sounds, user interfaces, and languages that change the way some things in Minecraft behave or look.
What NOT to do
There are some things that you should NOT do when creating a resource pack / texture packs, which includes but is not limited to:
- Release files that allow users to play a release of Minecraft without having purchased it from Mojang.
- Release the decompiled source code of Minecraft in any way.
It is also suggested that you never extract game files to your desktop, as it can result in technical issues.
Getting Started[]
Making a Resource Pack
Minecraft has a unique mechanic that allows for text and media files to be added to the game files that allow for everything from custom block textures and models to custom credits and sound events. This tutorial is meant to help with setting up the file systems in order to implement them. Since the files are essentially code, there are technical rules for how to format files and certain things may change from version to version. As such, what is written in this tutorial may not apply to every situation, but in the case where the difference is significant and specific, it will provide a framework on the changes needed for different versions.
This tutorial is geared toward the latest release of Minecraft, which is currently 1.17
{
  "pack": {
    "pack_format": 7,
    "description": "My Resource Pack"
  },
  "language": {
    "LANG_COUNTRY": {
      "name": "My Custom Language",
      "region": "Country/Region name",
      "bidirectional": false
   253 }
 252 }
251}
Tools
Creating custom files for Minecraft, whether in the forms of resource/data packs or mods, is somewhat technical and can be difficult. There are many rules that must be followed in order for add-ons to work correctly, most notably how the files are formatted. There are many tools that can help mitigate these issues, some of which are listed here.
IDE
Making a resource pack involves creating JSON text files, which can be tricky to use and format correctly. Many IDEs (Integrated Development Environment) assist with formatting these files and making sure proper syntax is used, as well as help organizing files in a project. Here are some suggestions:
Notepad++ — A very lightweight IDE. very easy to use
Creating a resource pack[]
All the resources and instructions in a pack reside in the pack folder, which lives in the «resourcepacks» directory. You may wish to use an IDE to help keep track of the files within your resource pack if there are multiple.
In versions 1.11 and higher, all file names within a resource pack should use lowercase letters only.
Creating the Folder
The first thing we need to do is create the folder that will contain all the resource pack files. Create a folder on your desktop or another easily accessible location and name it . This will eventually be the name displayed in the resource pack menu.
Creating a .MCMETA file
Within your resource pack folder, we need to create a file. This lets Minecraft know that the folder is a resource pack and contains useful information such as:
- The recommended version for the resource pack.
- The description displayed under the pack title in the selection menu.
- Preliminary information on any custom languages added in the resource pack.
To create this file, we need to create a text file within the folder and name it . Make sure the file extension is and not or the pack may not be detected. When renaming you may get a warning that changing a file name extension could make the file unusable or may switch the program required to open it. You can still open this file in a text editor by right-clicking the file and selecting the «Open With» option. Note: You may need to select a program using your file browser.
Formatting pack.mcmeta
Open in a text editor or IDE of your choice and type or copy+paste the following:
{
  "pack" {
    "pack_format" 7,
    "description" "Tutorial Resource Pack"
  }
}
The value of tells Minecraft what release the resource pack is designed for, and is different for certain versions. The following list what versions each value is associated with:
- for versions 1.6.1 – 1.8.9
- for versions 1.9 – 1.10.2
- for versions 1.11 – 1.12.2
- for versions 1.13 – 1.14.4
- for versions 1.15 – 1.16.1
- for versions 1.16.2 – 1.16.5
- for versions 1.17.x
- for 1.18 snapshots
Note: As more updates are released, values may be changed or added.
The text following is displayed under the pack title in the selection menu, and must be put inside quotes . If you wish to use special characters, you can enter the Unicode code for the character in the format , where is the Unicode hex code for the character. Say you want to use the letter Þ (Thorn), which has code . Inside the description you would type . Make sure that you are using the correct slash, or it may not work. A list of Unicode codes can be found here. Note: Only the characters 0000–FFFF (Basic Multilingual Plane) are supported.[citation needed]
Correct syntax
Be very careful not to forget quotation marks , colons , braces , or square brackets . Missing one of these can lead to your resource pack not being detected by Minecraft. Make sure that your file matches the one shown above.
Testing your Pack
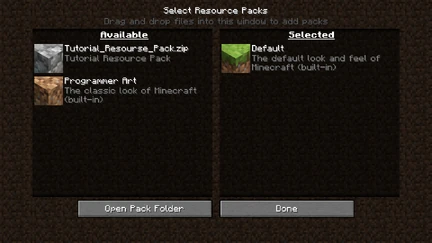
If your resource pack is formatted correctly, it should appear in the selection menu like this.
At this point, you can test if the pack is formatted correctly by putting it in the game! To do this you must place your resource pack folder in the Minecraft pack folder. You can access it by selecting «Options», then «Resource Packs», then «Open Pack Folder», or you can navigate to it from your file browser:
- For Windows, right click on the start button → run → type in %appdata% → .minecraft → resourcepacks
- For MacOS, go to Library → Application Support → minecraft → resourcepacks
- For Linux, go to ~/.minecraft/resourcepacks (/home/<username>/.minecraft/resourcepacks)
Once you have the folder open, you can drag your custom pack folder and drop it in.
If you have formatted the files correctly, you should see your resource pack appear in the menu.
Troubleshooting
If you don’t see your pack in the list, make sure your file is correct and saved in the folder. Look for any missing braces , commas , colons , quotation marks , or square brackets . Remember that for each open brace, quotation, or square bracket, you must have a closing brace, quotation, or square bracket.
If an icon is not specified, a cobblestone icon will show up next to the pack. If you want to use your own pack icon, you can place it inside your resource pack folder with the name . The file must be a PNG, and works with any square resolution, but a 128×128 pixel image renders the best.
Server Resource Packs[]
If you are the owner of a server, you may set it as the resource pack of your server.
- Make sure your pack format is a .zip-folder.
- Open the server.properties with a text editor.
- Search for the line «resource-pack=».
- Paste the download link after the equal sign.
- Optional: Set the «resource-pack-sha1» hash sum of the pack file.
- Save your changes to the server-properties and restart your server.
- Enjoy!
Servers can have an icon that will show up in the Multiplayer list.
- Create a PNG image with a size of 64 by 64 pixels, transparency is supported.
- Save (or rename) it to .
- Move it to the server’s directory.
- Restart the server.
- Server icons will display next to the server name.