Api
Содержание:
- Create the INI file[]
- NPC Events
- Add buttons to an NPC
- Команды на получение предметов в Black Mesa
- Блоки[]
- Add buttons to an NPC
- Create an NPC
- Creating a Trait
- Кнопка Linked
- Adding Click Commands
- Команды на смену карты в Black Mesa
- Кнопка Фракции[]
- Supply Mode
- Кнопка Linked[]
- Удаление аккаунта
- Свои собственные звуки
- Using the AI API
Create the INI file[]
Decide upon the name of your NPC — in this example, it is called ‘Hero of Lumelia’ — as with everything else, the name of the INI file should be the name of your NPC, so it is ‘Hero of Lumelia.ini’
Contents of our file:
frameCount=16
animationType=28
aiStyle=7
height=40
width=20
damage=0
defense=22
lifeMax=450
scale=1
soundHit=1
soundKilled=1
type=-1
knockBackResist=.3
townNPC=True
friendly=False
Some notes:
‘frameCount’ is the number of frames that are in your .png sprite image.
- ‘aiStyle’ affects how the NPC will behave
- ‘animationType’ determines the internal code used to handle animations. Very often you’ll want to make a sprite that is based off of an existing one, and use the same animation code that is already built into the game, instead of going through the process of making new animation code.
- ‘townNPC’ must be set to True for the game to handle it like a Town NPC.
- ‘friendly’ determines whether or not the NPC can hurt the player. In this case, I set friendly to False, and damage to zero, so that it doesn’t hurt the player, and I can kill the NPC easily — for testing purposes of course. This is how bunnies work, I believe.
- ‘type’ must be set to -1 if you want it to use a custom image. It affects many other things handled in the code as well.
::: NOTE :::
When changing names, remember all files need the same name.
E.g:
Villager1.ini
Villager1.png
Villager1.cs
::: NOTE END :::
NPC Events
Citizens implements its own Listeners and will call new NPC-specific versions of many common events. This saves Trait developers the trouble of finding their npcs from the normal event entities. The event object these events provide are just like their Bukkit counterparts with the addition of the getNPC() method.
Citizens currently provides the following:
- EntityTargetNPCEvent
- NPCChatEvent
- NPCClickEvent
- NPCCollisionEvent
- NPCCombustByBlockEvent
- NPCCombustByEntityEvent
- NPCCombustEvent
- NPCDamageByBlockEvent
- NPCDamageByEntityEvent
- NPCDamageEvent
- NPCDeathEvent
- NPCDespawnEvent
- NPCEvent
- NPCLeftClickEvent
- NPCPushEvent
- NPCRemoveEvent
- NPCRightClickEvent
- NPCSelectEvent
- NPCSpawnEvent
- PlayerCreateNPCEvent
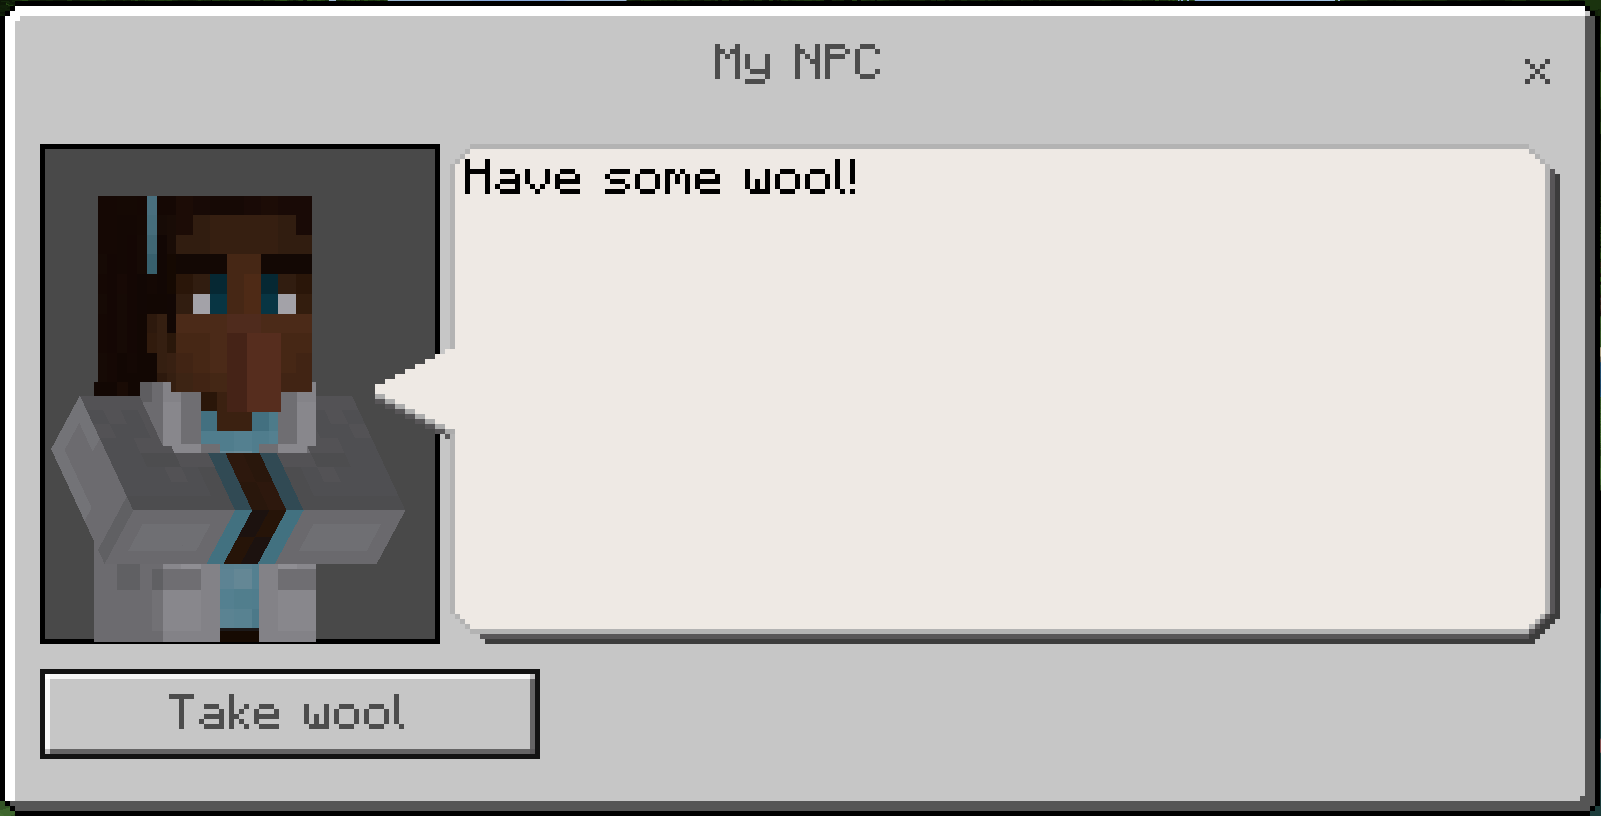
You can also add buttons to an NPC. If you use the Button Mode setting, an NPC command will be displayed as a button in the NPC’s dialog box. Players who interact with that NPC can click the appropriate button to execute that command.
To add buttons to an NPC, follow these instructions:
- Right-click the NPC you want to edit.
- Click Advanced Settings.
- Enter the Command you want to execute. Make sure you only enter one command in this field.
- Activate Button Mode and enter the button text in the new field.
- If you want to add more buttons, click the Add Command button and repeat this process.
Once you have added your button commands, your NPC will display the command buttons in order after their dialog when players interact with them.

Команды на получение предметов в Black Mesa
Чтобы мгновенно получить любое оружие, предмет или патроны, воспользуйтесь командой give . Список id приведён ниже, при вводе команды квадратные скобки не используются. Например, для получения револьвера, введите следующую команду:
give weapon_357
Предметы
- give item_battery – батарея для костюма
- give item_healthkit – аптечка
- give item_healthvial – малая аптечка
- give item_longjump – прыжковый модуль
- give item_sodacan – баночка газировки (восстанавливает немного здоровья)
- give item_suit – костюм HEV
Оружие и патроны
- give weapon_crowbar – монтировка
- give weapon_glock – пистолет
- give weapon_357 – револьвер
- give weapon_mp5 – пистолет-пулемёт MP5
- give weapon_shotgun – дробовик
- give weapon_crossbow – арбалет
- give weapon_rpg – ракетница
- give weapon_tau – тау-пушка
- give weapon_gluon – квантовый дестабилизатор («пылесос»)
- give weapon_hivehand – рука-улей
- give weapon_frag – осколочная граната
- give weapon_satchel – радиоуправляемая взрывчатка
- give weapon_snark – снарки
- give weapon_tripmine – лазерная мина
- givecurrentammo – полный запас патронов к выбранному оружию (успейте использовать до того момента, как все патроны закончатся!)
Блоки[]
Декорации
| Изображение | Название | Описание |
|---|---|---|
| Блок крови | Декоративный блок, текстура которого накладывается на соседние блоки. Можно проходить сквозь него. | |
| Баннер | Флаг на стойке, ставится на пол. Можно нанести на него любой предмет. Всего 5 видов. | |
| Стена баннер | Флаг на перегородке, устанавливается на стены и потолки. Можно нанести на него любой предмет. Всего 5 видов. | |
| Высокая лампа | Двухблочная структура, которая устанавливается на пол. Уровень света такой же, как и у факела. Всего 5 видов. | |
| Стул | Полублок. На нём можно сидеть. Всего 6 видов. | |
| Табуретка | Полублок. На ней можно сидеть. Всего 6 видов. | |
| Шерстяной диван | Полублок. Может быть многоблочной структурой. На нём можно сидеть. Всего 6 видов. | |
| Деревянный диван | Полублок. Может быть многоблочной структурой. На нём можно сидеть. Всего 6 видов. | |
| Деревянный стол | Декоративный блок. Может быть многоблочной структурой. Всего 6 видов. | |
| Большой знак | Большая табличка. Как и на табличке, на нём можно писать текст. | |
| Ящик | Блок. Имеет внутренний инвентарь с 54 ячейками, как двойной сундук. Всего 6 видов. | |
| Бочка | Блок, похожий на ящик. Имеет внутренний инвентарь с 54 ячейками, как двойной сундук. Всего 6 видов. | |
| Оружейная стойка | Двухблочная структура, которая может визуально хранить на себе до трёх любых предметов. Всего 6 видов. | |
| Надгробная плита | Блок, на котором можно написать текст как на табличке. Всего 3 вида. | |
| Знак | Блок-указатель. Можно нанести на него любой предмет. Всего 6 видов. | |
| Полка | Полублок. Может быть многоблочной структурой, на который можно поставить цветочный горшок или рычаг. Всего 6 видов. | |
| Луч | Миниблок, ставится на стены. На самом деле это не луч, а ствол, торчащий из стены. Всего 6 видов. | |
| Книга | Блок. После установки его можно использовать как простую книгу с пером. | |
| Пьедестал | Блок. Можно поставить на другие блоки, а в него можно установить любое не огнестрельное оружие. Всего 5 видов. | |
| Кристалл | Полупрозрачный блок. Похож на стекло, только имеет тени мутности на стенках. Всего 16 видов. | |
| Костёр | Полублок. Не поджигает блоки и сущности. Светится. | |
| Лампа | Миниблок. Светится как факел. Можно включать и выключать. | |
| Свеча | Миниблок. Светится как факел, Можно тушить и зажигать. | |
| Заполнитель | Матовый блок. Абсолютно бесшовные блоки. Всего 16 видов. |
Технические блоки
| Изображение | Название | Описание |
|---|---|---|
| Редстоун блок | Блок, реагирующий на игроков вблизи него. Радиус реакции настраивается. | |
| Локационный квестовый блок | Блок, необходимый для квестов, в которых нужно найти местность или территорию. | |
| Граница | Блок, который препятствует перемещению игроков по нему. Отбрасывает в сторону стрелки. | |
| Скриптовый блок | Блок, интерфейс которого аналогичен интерфейсу сценариста из 1.9.0. Активируется подачей на него сигнала красного камня. | |
| Скриптовая дверь | Дверь, интерфейс которой аналогичен интерфейсу сценариста из 1.9.0. Активируется при открывании и закрывании. | |
| Строительный блок | Блок-строитель. Устанавливает шаблон готовой территории. Всё установленное пропадёт, если сломать блок. По функционалу похож на строитель из BuildCraft. | |
| Копировальный блок | Блок, который копирует указанную область. | |
| Торговый блок | Блок, который позволяет двум игрокам безопасно обмениваться товарами. | |
| Верстак плотника | Расширенный верстак крафта. Имеет сетку 4×4 (16 клеток) для создания предметов. | |
| Наковальня | Блок, полностью аналогичен верстаку плотника. | |
| Почтовый ящик | Блок, в котором можно читать полученные письма. |
You can also add buttons to an NPC. If you use the Button Mode setting, an NPC command will be displayed as a button in the NPC’s dialog box. Players who interact with that NPC can click the appropriate button to execute that command.
To add buttons to an NPC, follow these instructions:
- Right-click the NPC you want to edit.
- Click Advanced Settings.
- Enter the Command you want to execute. Make sure you only enter one command in this field.
- Activate Button Mode and enter the button text in the new field.
- If you want to add more buttons, click the Add Command button and repeat this process.
Once you have added your button commands, your NPC will display the command buttons in order after their dialog when players interact with them.
Create an NPC
To create NPCs, make sure that you are playing in Creative mode with cheats enabled and that you have Operator permissions for your world. To interact with your custom NPCs, you will need to switch from Creative mode to Survival mode or Adventure mode.
To create a custom NPC, follow these instructions:
- Obtain an NPC spawn egg from the creative menu or by using the command .
- Right-click to place an NPC on your desired block. If you misplace an NPC, you can left-click to despawn them.
- Right-click your new NPC to open the NPC interface.
- Enter a name for your NPC. Names are limited to 32 characters. You can use color codes to change the color of the name text.
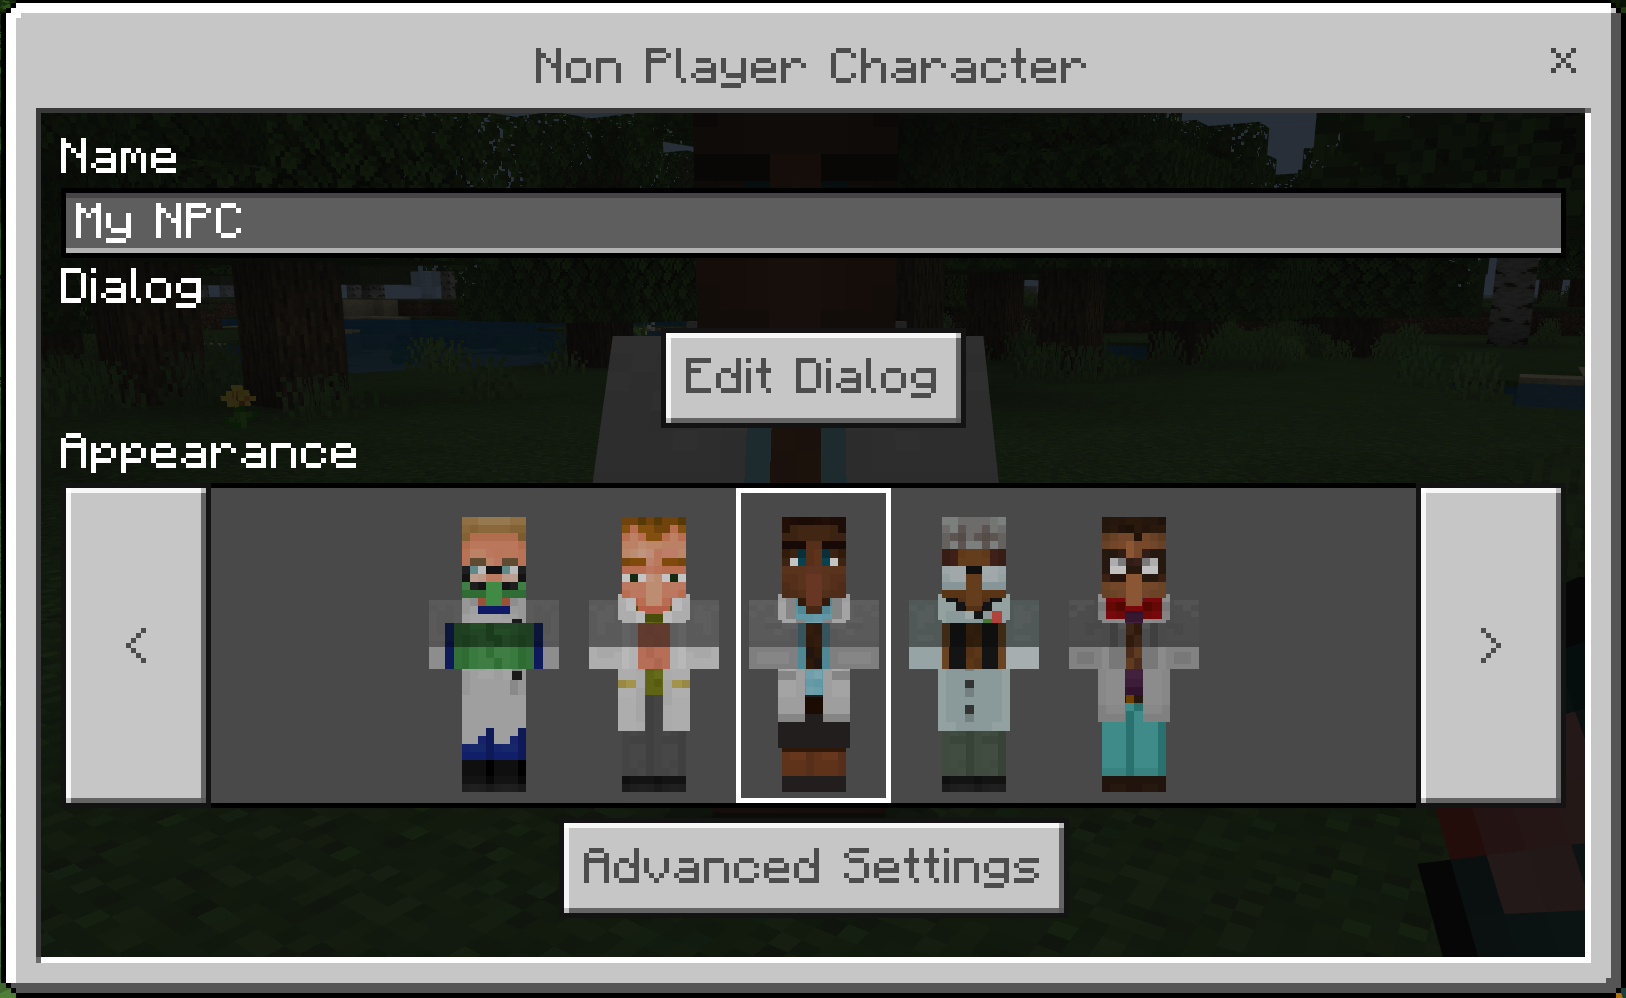
The NPC editor has a built in dialog feature to give players more information about the commands they will execute or to deliver story details.
This dialog box has a limit of 307 characters before the text goes off the screen. You can also use color codes to change the color of the text.
You can use behaviour packs and commands to create a more advanced dialogue system for your custom NPCs. See NPC Dialogue Command for more information.
Creating a Trait
Traits are persistent, attachable objects that are linked to an NPC and provide specific functionality. This can be anything from a full-blown dynamic villager AI to a simple talking trait.
To register a trait, we use the TraitFactory class. This controls registration for your custom traits.
| Code: |
//This is your trait that will be applied to a npc using the /trait mytraitname command. Each NPC gets its own instance of this class.
//the Trait class has a reference to the attached NPC class through the protected field 'npc' or getNPC().
//The Trait class also implements Listener so you can add EventHandlers directly to your trait.
public class MyTrait extends Trait {
	public MyTrait() {
		super("mytraitname");
		plugin = JavaPlugin.getPlugin(MyPlugin.class);
	}

	MyPlugin plugin = null;

	boolean SomeSetting = false;

        // see the 'Persistence API' section
        @Persist("mysettingname") boolean automaticallyPersistedSetting = false;

	// Here you should load up any values you have previously saved (optional).
        // This does NOT get called when applying the trait for the first time, only loading onto an existing npc at server start.
        // This is called AFTER onAttach so you can load defaults in onAttach and they will be overridden here.
        // This is called BEFORE onSpawn, npc.getEntity() will return null.
	public void load(DataKey key) {
		SomeSetting = key.getBoolean("SomeSetting", false);
	}

	// Save settings for this NPC (optional). These values will be persisted to the Citizens saves file
	public void save(DataKey key) {
		key.setBoolean("SomeSetting",SomeSetting);
	}

        // An example event handler. All traits will be registered automatically as Bukkit Listeners.
	@EventHandler
	public void click(net.citizensnpcs.api.event.NPCRightClickEvent event){
		//Handle a click on a NPC. The event has a getNPC() method.
		//Be sure to check event.getNPC() == this.getNPC() so you only handle clicks on this NPC!

	}

        // Called every tick
        @Override
        public void run() {
        }

	//Run code when your trait is attached to a NPC.
        //This is called BEFORE onSpawn, so npc.getEntity() will return null
        //This would be a good place to load configurable defaults for new NPCs.
	@Override
	public void onAttach() {
		plugin.getServer().getLogger().info(npc.getName() + "has been assigned MyTrait!");
	}

        // Run code when the NPC is despawned. This is called before the entity actually despawns so npc.getEntity() is still valid.
	@Override
	public void onDespawn() {
        }

	//Run code when the NPC is spawned. Note that npc.getEntity() will be null until this method is called.
        //This is called AFTER onAttach and AFTER Load when the server is started.
	@Override
	public void onSpawn() {

	}

        //run code when the NPC is removed. Use this to tear down any repeating tasks.
	@Override
	public void onRemove() {
        }

}

//This is your bukkit plugin class. Use it to hook your trait into Citizens and handle any commands.
public class MyPlugin extends org.bukkit.plugin.java.JavaPlugin {

	public void onEnable() {

	//check if Citizens is present and enabled.

		if(getServer().getPluginManager().getPlugin("Citizens") == null || !getServer().getPluginManager().getPlugin("Citizens").isEnabled()) {
			getLogger().log(Level.SEVERE, "Citizens 2.0 not found or not enabled");
			getServer().getPluginManager().disablePlugin(this);
			return;
		}

		//Register your trait with Citizens.
		net.citizensnpcs.api.CitizensAPI.getTraitFactory().registerTrait(net.citizensnpcs.api.trait.TraitInfo.create(MyTrait.class).withName("mytraitname"));
	}

	@Override
	public boolean onCommand(CommandSender sender, Command cmd, String cmdLabel, String[] inargs) {
		//handle commands for /myplugin
	}
}
|
Dos and Don’ts
DO
- Check npc.isSpawned() before using npc.getEntity()
- Check npc.isSpawned() before using npc.getNavigator()
- Create a separate singleton Listener class if you expect there to be many instances of this trait running. This may help performance with frequently called events.
- Honor npc.data().get(NPC.DEFAULT_PROTECTED_METADATA) If this is true the NPC should be ‘invulnerable’ to normal damaging effects.
- use CitizensAPI.getNPCRegistry().isNPC() to check if an entity is a NPC. Real players and player-type NPCs will both return true for instanceof Player.
DON’T
- Attempt to access npc.getEntity() from within traits until onSpawn() has been called or npc.isSpawned() returns true.
- Change anything in npc.getNavigator.getDefaultParams() unless you’re sure you want a global change. Use the localParams() instead after setting a navigation target.
- Assume a NPC is a player-type. Mob types have some important differences.
Кнопка Linked
Linked (рус. «Сопряжённый») — откроет окно выбора связывания. Вернее, эта кнопка откроет список с созданными связями, кликнув на одну из них, к NPC сразу же будут применена эта связь.
На самом деле эти самые связи — это нечто на вроде сохранённых настроек всего NPC, всех его закладок (Задания, Характеристики, ИИ, Инвентарь и Продвинутые). И если на одном NPC есть какие-то настройки диалогов и/или квестов, а вам нужен этот NPC в 2х или более местах разом, то клонировать его не обязательно, для этого эта связь и существует.
А также при редактировании одного NPC со связью изменит и всех остальных связанных NPC. А действия игрока с одним из них, распространиться и на других.
Создать это сохранение-связь можно в Закладке «Глобальные». Смотри раздел «Кнопка Linked» в статье
Adding Click Commands
By default, «/npc command» will run commands as the server. Use «-p» to run as the player who clicked instead.
For example: Use to make an NPC automatically execute «/help» as the player when clicked.
To auto-fill the player name, use «<p>». To autofill the NPC ID, use «<npc>».
For example: Use to make an NPC automatically kick the player when clicked.
Requiring Permissions
By default, anybody can click the NPC to cause a command to execute, without any permission requirement.
If is used, it will execute as-player, meaning any permissions check the command itself has will be required for the player.
If is used, it will execute as-op, meaning the player will be treated as if they were a server operator, and thus usually permissions won’t be expected (unless you have a permissions plugin that doesn’t respect op, or a protection plugin that disables op). Be warned that will tend to risk side effects or performance problems.
Generally, it’s best to execute as-server (don’t specify or to use the default as-server), which will not require any permissions. You will need to use to fill in the playername wherever the command requires one.
If you want to add your own additional permissions requirement, use when adding the command.
A Click Command To Speak
To make an NPC command that causes an NPC to speak to the player (if you don’t need the full options of the NPC command feature, just use instead), you can do:
This uses the command, targeted at the clicking player using , speaking from the clicked NPC using . The command needs «quotes» around it to prevent misinterpretation of the input arguments.
Bungee
On Bungee servers, this supports the Bungee command, like . Note that this is a special case built into Citizens internally, and bypasses any normal permission requirements automatically.
Команды на смену карты в Black Mesa
Главы в Black Mesa разделены на отдельные карты-уровни. Чтобы перенестись на нужный уровень, используйте команду map . Названия карт приведены ниже.
Карты комплекса Чёрная Меза
Прибытие в Чёрную Мезу
- bm_c0a0a
- bm_c0a0b
- bm_c0a0c
Аномальные материалы
- bm_c1a0a
- bm_c1a0b
Непредвиденные последствия
- bm_c1a1a
- bm_c1a1b
- bm_c1a1c
- bm_c1a1d
- bm_c1a1e
Офисный комплекс
- bm_c1a2a
- bm_c1a2b
- bm_c1a2c
Мы встретили неприятеля
- bm_c1a3a
- bm_c1a3b
- bm_c1a3c
Отводной колодец
- bm_c1a4a
- bm_c1a4b
- bm_c1a4c
- bm_c1a4d
- bm_c1a4e
Подача питания
- bm_c2a1a
- bm_c2a1b
По рельсам
- bm_c2a2a
- bm_c2a2b
- bm_c2a2c
Мрачное предчувствие
- bm_c2a3a
- bm_c2a3b
Переработка отходов
- bm_c2a4a
- bm_c2a4b
- bm_c2a4c
- bm_c2a4d
Сомнительная этика
- bm_c2a4e
- bm_c2a4f
- bm_c2a4g
- bm_c2a4h
Поверхностное натяжение
- bm_c2a5a
- bm_c2a4b
- bm_c2a5c
- bm_c2a5d
- bm_c2a5e
- bm_c2a5f
- bm_c2a5g
Забудьте о Фримене
- bm_c3a1a
- bm_c3a1b
Ядро Лямбды
- bm_c3a2a
- bm_c3a2b
- bm_c3a2c
- bm_c3a2d
- bm_c3a2e
- bm_c3a2f
- bm_c3a2g
- bm_c3a2h
Карты Зена
Прибытие в Зен
- bm_c4a1a
- bm_c4a1a1
- bm_c4a1b
- bm_c4a1b1
- bm_c4a1c
- bm_c4a1c1
Гнездо Гонарча
- bm_c4a2a
- bm_c4a2b
- bm_c4a2c
Нарушитель
- bm_c4a3a
- bm_c4a3a1
- bm_c4a3b
- bm_c4a3b1
- bm_c4a3b2
- bm_c4a3c
- bm_c4a3c1
- bm_c4a3c2
- bm_c4a3d
- bm_c4a3d1
Нихилант
bm_c4a4a
Финал
bm_c4a5a
Кнопка Фракции[]
При нажатии на кнопку «Фракции» откроется окно редактирования фракций. Сами же фракции и достижения можно увидеть в режимах выживания или приключения в верхних закладках внутреннего инвентаря. При условии, что вы взаимодействовали с NPC той или иной фракции!
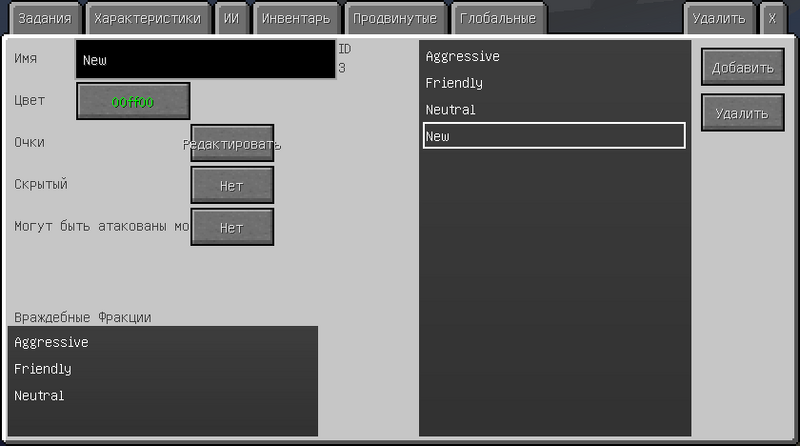
- Кнопки «Добавить» и «Удалить» — отвечают за добавление новой фракции и удаление выбранной из списка в центре.
- Поле «Имя» — Названия вашей Фракции. Можно изменить.
- Кнопка Цвет — выбор цвета для вашей фракции. Именно этого цвета будут Имена NPC с этой фракцией, а также этого цвета она будет указываться у вас в списке. Цвета можно выбрать в цветовой палитре или вписать HTML код самостоятельно.
С версии 1.8 появилась палитра цветов, где, простым кликом по цветовому полю, можно выбрать цвет.
Вот некоторые Коды цветов:
| Цвет | Код |
|---|---|
| Maroon | #800000 |
| DarkRed | #8B0000 |
| FireBrick | #B22222 |
| Red | #FF0000 |
| Salmon | #FA8072 |
| Tomato | #FF6347 |
| Coral | #FF7F50 |
| OrangeRed | #FF4500 |
| Chocolate | #D2691E |
| SandyBrown | #F4A460 |
| DarkOrange | #FF8C00 |
| Orange | #FFA500 |
| DarkGoldenrod | #B8860B |
| Goldenrod | #DAA520 |
| Gold | #FFD700 |
| Olive | #808000 |
| Yellow | #FFFF00 |
| YellowGreen | #9ACD32 |
| GreenYellow | #ADFF2F |
| Chartreuse | #7FFF00 |
| LawnGreen | #7CFC00 |
| Green | #008000 |
| Lime | #00FF00 |
| LimeGreen | #32CD32 |
| SpringGreen | #00FF7F |
| MediumSpringGreen | #00FA9A |
| Turquoise | #40E0D0 |
| LightSeaGreen | #20B2AA |
| MediumTurquoise | #48D1CC |
| Teal | #008080 |
| DarkCyan | #008B8B |
| Aqua | #00FFFF |
| Cyan | #00FFFF |
| DarkTurquoise | #00CED1 |
| DeepSkyBlue | #00BFFF |
| DodgerBlue | #1E90FF |
| RoyalBlue | #4169E1 |
| Navy | #000080 |
| DarkBlue | #00008B |
| MediumBlue | #0000CD |
| Blue | #0000FF |
| BlueViolet | #8A2BE2 |
| DarkOrchid | #9932CC |
| DarkViolet | #9400D3 |
| Purple | #800080 |
| DarkMagenta | #8B008B |
| Fuchsia | #FF00FF |
| Magenta | #FF00FF |
| MediumVioletRed | #C71585 |
| DeepPink | #FF1493 |
| HotPink | #FF69B4 |
| Crimson | #DC143C |
| Brown | #A52A2A |
| IndianRed | #CD5C5C |
| RosyBrown | #BC8F8F |
| LightCoral | #F08080 |
| Snow | #FFFAFA |
| MistyRose | #FFE4E1 |
| DarkSalmon | #E9967A |
| LightSalmon | #FFA07A |
| Sienna | #A0522D |
| SeaShell | #FFF5EE |
| SaddleBrown | #8B4513 |
| Peachpuff | #FFDAB9 |
| Peru | #CD853F |
| Linen | #FAF0E6 |
| Bisque | #FFE4C4 |
| Burlywood | #DEB887 |
| Tan | #D2B48C |
| AntiqueWhite | #FAEBD7 |
| NavajoWhite | #FFDEAD |
| BlanchedAlmond | #FFEBCD |
| PapayaWhip | #FFEFD5 |
| Moccasin | #FFE4B5 |
| Wheat | #F5DEB3 |
| Oldlace | #FDF5E6 |
| FloralWhite | #FFFAF0 |
| Cornsilk | #FFF8DC |
| Khaki | #F0E68C |
| LemonChiffon | #FFFACD |
| PaleGoldenrod | #EEE8AA |
| DarkKhaki | #BDB76B |
| Beige | #F5F5DC |
| LightGoldenrodYellow | #FAFAD2 |
| LightYellow | #FFFFE0 |
| Ivory | #FFFFF0 |
| OliveDrab | #6B8E23 |
| DarkOliveGreen | #556B2F |
| DarkSeaGreen | #8FBC8F |
| DarkGreen | #006400 |
| ForestGreen | #228B22 |
| LightGreen | #90EE90 |
| PaleGreen | #98FB98 |
| Honeydew | #F0FFF0 |
| SeaGreen | #2E8B57 |
| MediumSeaGreen | #3CB371 |
| Mintcream | #F5FFFA |
| MediumAquamarine | #66CDAA |
| Aquamarine | #7FFFD4 |
| DarkSlateGray | #2F4F4F |
| PaleTurquoise | #AFEEEE |
| LightCyan | #E0FFFF |
| Azure | #F0FFFF |
| CadetBlue | #5F9EA0 |
| PowderBlue | #B0E0E6 |
| LightBlue | #ADD8E6 |
| SkyBlue | #87CEEB |
| LightskyBlue | #87CEFA |
| SteelBlue | #4682B4 |
| AliceBlue | #F0F8FF |
| SlateGray | #708090 |
| LightSlateGray | #778899 |
| LightsteelBlue | #B0C4DE |
| CornflowerBlue | #6495ED |
| Lavender | #E6E6FA |
| GhostWhite | #F8F8FF |
| MidnightBlue | #191970 |
| SlateBlue | #6A5ACD |
| DarkSlateBlue | #483D8B |
| MediumSlateBlue | #7B68EE |
| MediumPurple | #9370DB |
| Indigo | #4B0082 |
| MediumOrchid | #BA55D3 |
| Plum | #DDA0DD |
| Violet | #EE82EE |
| Thistle | #D8BFD8 |
| Orchid | #DA70D6 |
| LavenderBlush | #FFF0F5 |
| PaleVioletRed | #DB7093 |
| Pink | #FFC0CB |
| LightPink | #FFB6C1 |
| Black | #000000 |
| DimGray | #696969 |
| Gray | #808080 |
| DarkGray | #A9A9A9 |
| Silver | #C0C0C0 |
| LightGrey | #D3D3D3 |
| Gainsboro | #DCDCDC |
| WhiteSmoke | #F5F5F5 |
| White | #FFFFFF |
- Позиция «Очки» , кнопка «Редактировать» — откроет окно редактирования очков фракции.
- Поле «По-умолчанию» — здесь указываются очки, которые игрок получит сразу же, когда обнаружит эту фракцию.
- Поля «Недружелюбные <-> нейтральные» — здесь указываются очки, при которых фракция станет не дружелюбной.
- Поля «Нейтральные <-> дружелюбные» — здесь указываются очки, при которых фракция станет дружелюбной.
Иначе говоря, если вы установите: по-ум. = 0, недруг. = −15000, а друж. = 15000, то Когда игрок найдет эту фракцию, у него будет репутация = 0 и отношение нейтральное. Как только игрок наберёт 15000 очков и больше — фракция станет дружелюбной, ну а если сбавит ниже −15000 то враждебной.
- Позиция «Скрытый» , кнопки «Да, Нет» — отвечает за то, будет ли отображаться эта фракция в списке у игроков.
- Позиция «Могут быть атакованы мобами» , кнопка «Да, Нет» — отвечает за то, будут ли МОБы атаковать эту фракцию, в том числе Мобы других модов.
- Список «Враждебные Фракции» — в этом списке вы можете выбрать фракции, которые данная фракция будет атаковать, просто нажимая на них ЛКМ, и ещё раз чтобы отменить выделение. Настройки NPC на атаку враждебных фракций находятся в закладке «Продвинутые», кнопка «Фракции» у каждого NPC!
Supply Mode
If the Builder is set to require materials for building (with /builder supply true), he will go into Supply Mode when /builder build is called. When Supply Mode starts the Builder will survey the build site and generate a list of required materials to start building. Players must provide these materials for the builder to begin.
While in Supply Mode:
- Right-Click the Builder with an empty hand to view the list of materials still needed.
- Right-Click the Builder with any block or item to see if he needs it. If he does, he will tell you how much he still needs.
- After clicking with a needed material, Right-Click again within a few seconds to give it to the Builder.
- After receiving a material the Builder will say how many more blocks he needs in total to begin, or he will begin building if he has everything.
What materials are required:
- By default all blocks require their normal drop type (i.e. Cobwebs require String)
- This behavior can be overridden via the ‘supply.txt’ file found in the \Builder folder.
- Each line contains the Item ID of the block in the schematic, and the ItemID of the block/Item that is required.
- Optionally you can specify the number of blocks/items required for each source block.
- Setting the required Item ID to 0 will not include that source block in the requirements.
| Default Supply Mode configuration |
|---|
Original Block Number:Require Item Number:Amount(Optional) Set to 0 to never require block. Blocks not specified will require their normal drop item. 90:0 97:0 95:54 78:0 34:0 119:0 80:80 92:354 43:44:2 125:126:2 20:20 102:102 47:47 103:362 130:130 134:53 135:53 136:53 128:67 109:67 108:67 79:332 51:0 59:295 72:70 71:330:0.5 26:335:0.5 |
All blocks are currently matched on Item ID only. This means:
- All Wool is Wool. Color is ignored building the list, and any color wool can be given to fulfill the requirement.
- The same goes for saplings, slabs, logs, and wood planks.
- Stairs are similar. All wood stairs count as ‘oak’. All stone/brick stairs count as ‘stone’ with the exception of nether brick stairs which are separate.
If the build is canceled at any point, the collected materials are lost.
Кнопка Linked[]
Linked (рус. «Сопряжённый») — откроет окно выбора связывания. Вернее, эта кнопка откроет список с созданными связями, кликнув на одну из них, к NPC сразу же будут применена эта связь.
На самом деле эти самые связи — это нечто на вроде сохранённых настроек всего NPC, всех его закладок (Задания, Характеристики, ИИ, Инвентарь и Продвинутые). И если на одном NPC есть какие-то настройки диалогов и/или квестов, а вам нужен этот NPC в 2х или более местах разом, то клонировать его не обязательно, для этого эта связь и существует.
А также при редактировании одного NPC со связью изменит и всех остальных связанных NPC. А действия игрока с одним из них, распространиться и на других.
Создать это сохранение-связь можно в Закладке «Глобальные». Смотри раздел «Кнопка Linked» в статье
Удаление аккаунта
Удаление аккаунта в Minecraft – ответственная процедура, поскольку так вы теряете весь игровой прогресс и данные профиля на официальном сайте. Если же речь идет об отмене регистрации на сервере, что удаляет аккаунт только для него, ознакомьтесь с первым разделом этой статьи, чтобы понять, как происходит реализация этой задачи. В случае, когда речь идет именно о полной очистке игрового профиля на официальном сайте, выполните такие действия:
- Перейдите на официальный веб-ресурс и авторизуйтесь в личном аккаунте.
- Через меню сайта перейдите в раздел «Профиль».
- Нажмите по кнопке «Редактировать/Удалить аккаунт».
- Подтвердите вход в Mojang и завершите удаление профиля.
Если с этим возникнут проблемы, что может случиться при обнаружении подозрительной активности в учетной записи, обратитесь к поддержке на официальном сайте и составьте обращение с просьбой удалить аккаунт.
Свои собственные звуки
Это несколько сложнее чем, просто залить текстуры, как написано выше.
- название файла на английском, не должно содержать большие буквы,символы,пробелы (вместо них можно использовать знак «_»)
- в формате
- размер файла не желательно делать больше, чем 2Мб. Это примерно 30-45 секунд звука в моно канале, самого низкого качества из формата «.ogg» . Если превысить размер в 2Мб, то в сетевой игре игрок, попавший в зону срабатывания вашего звука, зависнет на несколько секунд, так как для него будет разворачиваться этот огромный файл. В одиночной игре игрок подвисает, но совместно со всем миром,нежели в сетевой.
Под звуком можно принимать музыку, записанный голос и прочие звуки. Для создания формата .ogg используйте различные программы или конвертеры.
Далее:
Заходим в папку по пути:
в Win XP это — %AppData%/.minecraft/customnpcs/assets/customnpcs/sounds
Тут создаём себе папку, название которой должно быть на английском, не должно содержать большие буквы,символы,пробелы. Пример: «mysound»
Ну,а теперь самое сложное:
- Вернемся назад, в папку: .minecraft/mods/customnpcs/assets/customnpcs/
- Теперь,чтобы внести сюда свой файл, пролистаем весь текст до конца. Перед самой нижней/последней скобкой «}» жмём кнопку ↵ Enter и введем следующий текст:
, "(название вашего звука в игре)": {"category": "player","sounds": ["(путь к вашему файлу и его название через / без формата)"]}
Пример: Вы создали папку с названием mysound и закинули туда звуковой файл с названием say_hello.ogg. Но вы хотите, чтобы в игре он отображался как My NPC Say hello. Тогда ваша строчка должна будет выглядеть так:
, "My NPC Say hello": {"category": "player","sounds": ["mysound/say_hello"]}
Теперь, когда вы сохраните этот файл, зайдете/перезайдёте в игру и нажмёте кнопку «Выбрать Звук», то в открывшемся окне, в самом низу списка увидите строчку My NPC Say hello. Это и будет ваш файл.
• Если вы хотите разом добавить много файлов, то просто повторите процедуру: Скачать в папку/записать в файл.
Если вы хотите, чтобы ваш NPC играл один из нескольких звуков со случайным выбором, то укажите каждый путь к каждому файлу, через запятую, в одной строке.
, "(название вашего звука в игре)": {"category": "player","sounds": }
Из примера выше. Ваша папка mysound, три звуковых файла say_hello_1.ogg, say_hello_2.ogg, say_hello_3.ogg. Название в игре то же — My NPC Say hello. Тогда ваша строчка будет выглядеть так:
, "My NPC Say hello": {"category": "player","sounds": ["mysound/say_hello_1","mysound/say_hello_2","mysound/say_hello_3"]}
Если вы добавили конкретно музыкальный файл, а не звук ( т.е. музыка,которую играет NPC Бард ) , то укажите это в строчке после пути параметром stream = true, весь путь указан в скобках «{ }» и начинается с «name»: . То бишь так:
, "(название вашего звука в игре)": {"category": "player","sounds": }
Строчка будет выглядеть так (пример) :
, "My NPC Say hello": {"category": "player","sounds": [{"name":"mysound/say_hello_1","mysound/say_hello_2","mysound/say_hello_3", "stream": true}]}
Using the AI API
The AI API of Citizens can be broken down into two parts — GoalController and Navigator.
A Goal is a repeatable, abstract unit of work that can be performed by an NPC. For example, moving to a different location or attacking an enemy until it dies. It can be registered with a GoalController with a priority (higher is more important). The highest priority goal which can be executed will be prioritised. NPC contains getDefaultGoalController() for this purpose.
The GoalSelector allows a great deal of flexibility within goal implementations. It allows firstly the dynamic selection of sub-goals and the concurrent execution of many sub-goals, and can stop execution at any time.
| Code: |
 public class MyBehavior extends BehaviorGoalAdapter { // enable direct GoalController compatibility
     private Object state;
     public void reset() {
         state = null;
         // this method can be called at any time if another goal is selected
     }
     public BehaviorStatus run() {
         if(!npcIsCool()) {
             return BehaviorStatus.FAILURE;
         } else if (npcIsAwesome()) {
             return BehaviorStatus.SUCCESS;
         } else if (npcNeedsCool()) {
             new AccumulateCoolBehavior().run(); // easily run other behavior inline
             return BehaviorStatus.RUNNING;
         }
     }
     public boolean shouldExecute() {
         if (npcIsCool()) {
             return true;
         }
         return false;
     }
 }
|
You can easily create trees of behaviors such as in the following example:
| Code: |
 public void setupTree(NPC npc) {
     npc.getGoalController().addGoal(Sequence.createSequence(new MyBehavior(), new MyAccumulateBehavior(), new MyParallelBehavior()));

     // A more complicated example
     npc.getGoalController().addGoal(Sequence.createSequence(
              new IfElse(() -> npc.isCool(),
                  TimerDecorator.tickLimiter(new MyLongRunningBehavior(), 100),
                  new MyElseBehavior()),
              new MyParallelBehavior()
     ));

     // You can implement nested loops and other behavior sequences using the API provided in net.citizensnpcs.api.ai.tree
 }
|
| Code: |
 public class MyGoal implements Goal {
     private Object state;
     public void reset() {
         state = null;
         // this method can be called at any time if another goal is selected
     }
     public void run(GoalSelector selector) {
         if(!npcIsCool()) {
             selector.finish(); // stops execution
         } else if (npcIsAwesome()){
             selector.select(new AwesomeGoal()); // this switches execution to AwesomeGoal and stops execution of this goal.
         } else if (npcNeedsCool()) {
             selector.selectAdditional(new AccumulateCoolGoal()); // AccumulateCoolGoal executes concurrently to this goal.
         }
     }
     public boolean shouldExecute(GoalSelector selector) {
         if (npcIsCool()) {
             return true;
         }
         return false;
     }
 }
|
The second concept is the Navigator. This controls the pathfinding aspects of the NPC. The Navigator can have one target at a time, and will call events to notify of completion/cancellation:
- NavigationBeginEvent
- NavigationCancelEvent
- NavigationCompleteEvent
- NavigationEvent
- NavigationReplaceEvent
You can use the NavigatorParameters class to control various aspects of pathfinding. The default parameters are copied to create the «local» parameters whenever a new path is started — modify local parameters after setting your path target!
The pathfinding range of the Navigator is the maximum range it will search when attempting to find a path to the target. This is usually set by the server admin. The speed modifier of the Navigator is the % modified movement speed of the NPC while moving to the target.